


A Beginner’s Guide on WordPress Conversion Tracking
Increased website views and visitors are beneficial. But what comes critical is the leads and conversions.
Conversions include everything from email subscriptions to sign-ups and sales of goods and services. But how would you know if any of these efforts are effective or not, and which areas require development, if you don't keep track of everything?
You might be putting in your best efforts but must be going towards the wrong marketing channel. Furthermore, you may have employed SEO services for WordPress, but they are also not delivering the results you are expecting.
So, for a better understanding, let us go through the complete guide to WordPress website conversion monitoring divided into sections.
Conversion Tracking Defined
Conversion tracking is a strategy that helps to track and evaluate the efficacy of marketing campaigns.
To put it another way, it's a method for determining how many people performed the intended activities and demonstrating the effectiveness of marketing campaigns.
Conversions may include:
- Subscribing to the email newsletter by filling out the form
- Purchase completed successfully
- Reading relevant blog entries
- Downloading an eBook and more
Importance of Conversion Tracking
Conversion monitoring is required on every website, be it the eCommerce sites or marketing blogs. This is because, to expand a business, data-driven decisions must be taken, and conversion tracking helps in this process. As a result, you'll have to make assumptions regarding which techniques generate ROI because you won't know for sure.
Other reasons as to why conversion tracking is vital involves:
- Improved ROI: Although every paid ad may have a good CTR, it may not always be successful in converting the potential leads. As a result, you must optimize or pause such ads depending on all of this information about where you're falling short while boosting ROI.
- Understanding What’s Functioning and What’s Not: Be it a social media ad or email marketing, tracking conversions lets you realize which of the efforts are converting and which are not. Once you've realized it, make the necessary changes.
Overall, analyzing the failures and successes both and making changes as needed can help the company flourish.
Ways to Set Up WordPress Conversions Tracking for Google Ads
Google Analytics Conversion Set Up
Many experts rely on Google Analytics as they find it the best tool for tracking website traffic. Plus, it helps in exploring insights into how users interact with your site and which of your efforts appears to be productive.
As a result, first and foremost, install the Google Analytics plugin on your website. Now, follow the below-given steps:
Step 1: Install MonsterInsights
Install and enable MonsterInsights on the site. This is Google Analytics' best plugin, which includes enhanced eCommerce tracking, form monitoring, and other built-in capabilities.
Go to Insights>Reports in the WordPress dashboard after you've finished enabling the plugin. When you run the setup wizard, a dialogue window will display on the screen requesting you to configure MonsterInsights.
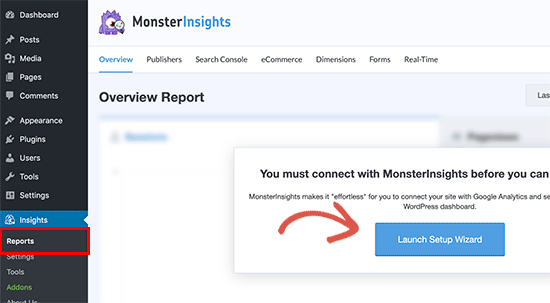
Connect WordPress and Google Analytics using the instructions provided.
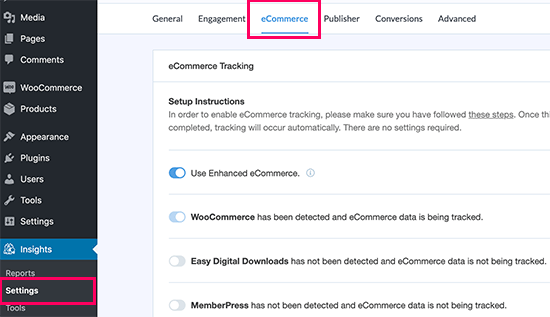
Step 2: Activate Improved eCommerce Conversion Tracking
eCommerce tracking may help you figure out which products are selling well, which goods are only being noticed, and which source is the most crucial for enhancing ROI.
To begin, go to your Google Analytics dashboard to activate advanced eCommerce conversion tracking. Now, go to the dashboard and click your site.
Click the admin button at the bottom of the screen on the left side.
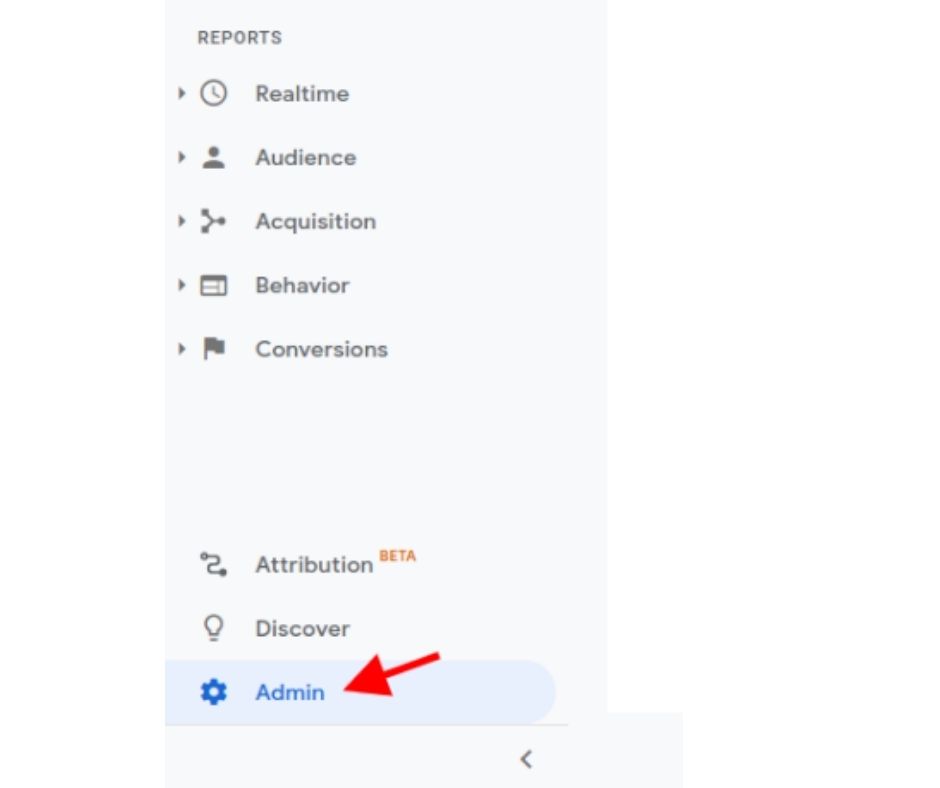
Multiple Google Analytics settings will appear on the screen. Tap the ‘Ecommerce Settings' option in the ‘View' column.
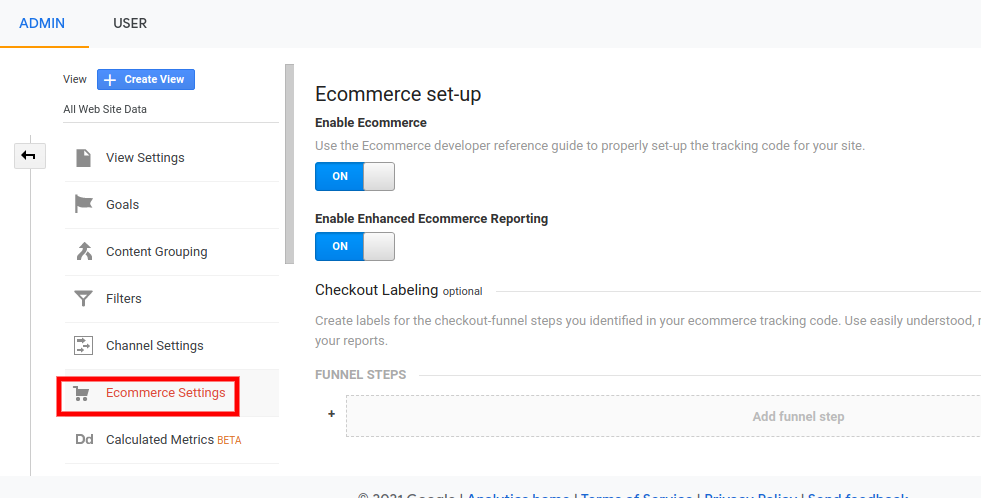
Now, enable the ‘Enable Enhanced Commerce’ and ‘Enable eCommerce’ options.
Step 3: Enabling Form Conversion Tracking on Google Analytics
The eCommerce platform is not used by all business websites to execute business. For example, the beauty business may leverage the booking form, restaurant or other eatery businesses may use the online delivery forms, and so on.
Furthermore, many firms employ contact forms to generate leads from their websites. In addition, email newsletters are included on blogs or news pages to convince visitors into potential subscribers.
As a result, activate form conversion monitoring in Google Analytics to track them.
To do so, go to Insights>Addons. Now, read down and click on the install button under the ‘Forms' add-on.
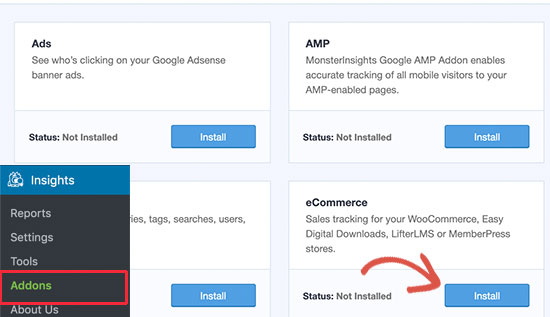
After you've completed the installation, go to Insights and then Settings. Further, move to the Conversion tab.
As a result, the MonsterInsights plugin will identify the WordPress form plugin immediately and begin tracking other available forms on your site.
Google Analytics Conversion Tracking Goals
Above, we learned how to install WordPress forms to track eCommerce and conversions.
Now comes the question of how to manually set up conversion objectives and track them using Google Analytics.
When we talk about tracking conversions, setting up Google Analytics goals comes first.
For example, you want to consider a customer’s visit to your site as a conversion. However, no action takes place, such as signing up for a newsletter or making an online purchase. As a result, it won't show up as a conversion in your reports.
Here, the Google Analytics tool enables you to establish your own conversion goals and monitor them accordingly.
How to do so?
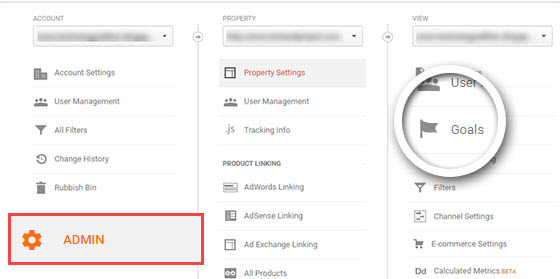
Open the Google Analytics Dashboard, tap Admin, and then choose Goals from the View menu.
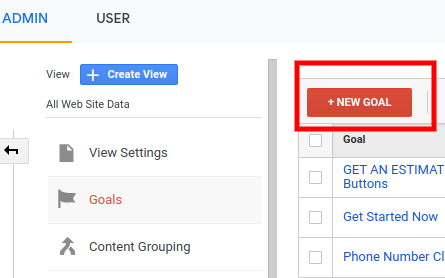
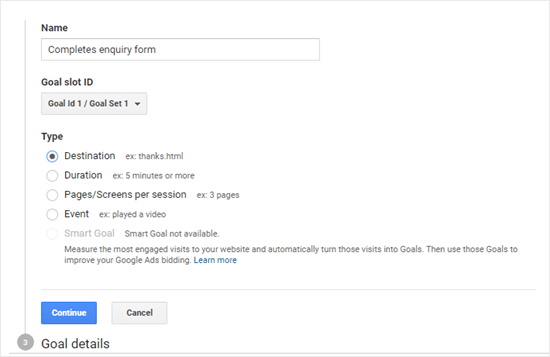
Now, press the +New Goal option to set up your preferred goal. The goals options will appear on the screen.
- Destination: This objective allows you to determine if a visitor visited a given web page. It might be any conversion-related page on the site.
- Event: This goal can be used to measure things like video plays, mouse clicks, and downloads, and so on.
- Duration: This goal lets you analyze the time a visitor spends on your site. The more time they spend on your site, the higher the level of engagement.
For example, let us create a Destination goal to track the visitors visiting the thank you page once they complete filling the form.
To begin, give your goal a name. Keep it meaningful so you can find it in Google Analytics reports quickly. Under the goal types, pick Destination and hit the continue option.
Once done, simply enter the last element of the URL that you wish to monitor.

Similarly, if you aim to monitor a funnel, like a customer moving through a checkout procedure, perform this as part of your Destination goal only. This will assist you in focusing on the areas that require improvement.
Enter the Save button once you're committed to a specific goal and are satisfied with it. Moreover, it will show up on the table of goals.
Tracking Google Ads Conversion in Google Analytics
For example, if you use Google Ads to bring targeted traffic to websites, you would undoubtedly be required to monitor those conversions.
However, because the procedure is complex, we'll go over it step by step.
Step 1: Integrate your Google Ads Account to Your Google Analytics
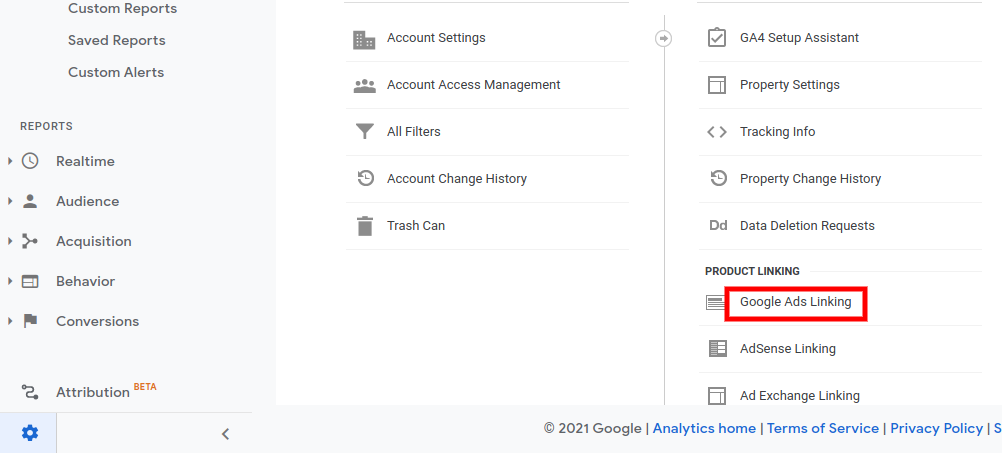
Sign in to your Google Analytics panel and select the admin option on the screen.
Now, under the ‘Property' column, press the ‘Google Ad Linking' button.
The next step is to pick a Google Ads account. In this case, your Google Analytics account must also have access to your Google Ads account.
After that, go to the ‘Link Configuration area and give this link group a title, as well as enable all of the website data.
Ultimately, check the box next to the choice to "Share my analytics data with a linked Google ads account." You'll be able to monitor Google Analytics goals in Google Ads this way.
When done, save the changes you made by hitting the link account button.
Once you've saved all of your adjustments and linked your Google Analytics account to your advertisements account, analytics will be able to monitor ads responsible for conversions.
Step 2: Activate Google Ads Conversion Tracking
Of course, you'll need to enable conversion tracking for your online store's ads. This is because it will allow you to evaluate the ad budget with achieved ROI for such ads. This is because it will allow you to evaluate the ad budget with achieved ROI for such ads.
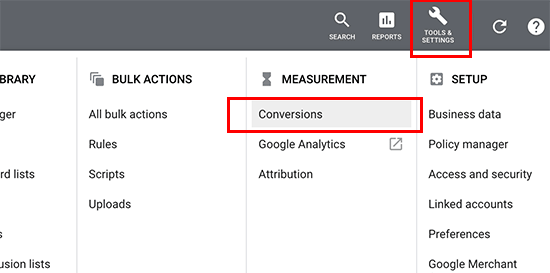
Sign in to your Google Ads account option and click ‘Tools & Settings from the menu bar. From the Measurement section, choose the ‘Conversions' link.
The next step comes to choosing the website when questioned about what you need to monitor.
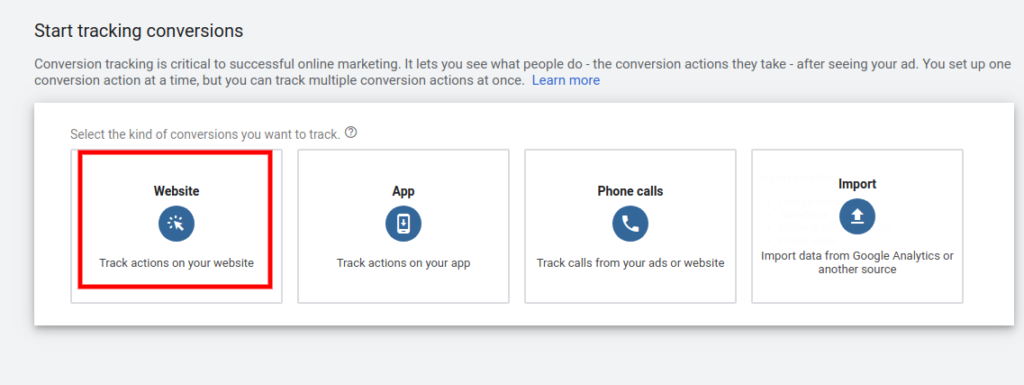
Now, the screen to configure the tracking conversions will appear. A variety of choices will display. Monitoring transactions, sign-ups, adding to cart, and so on are examples of these.
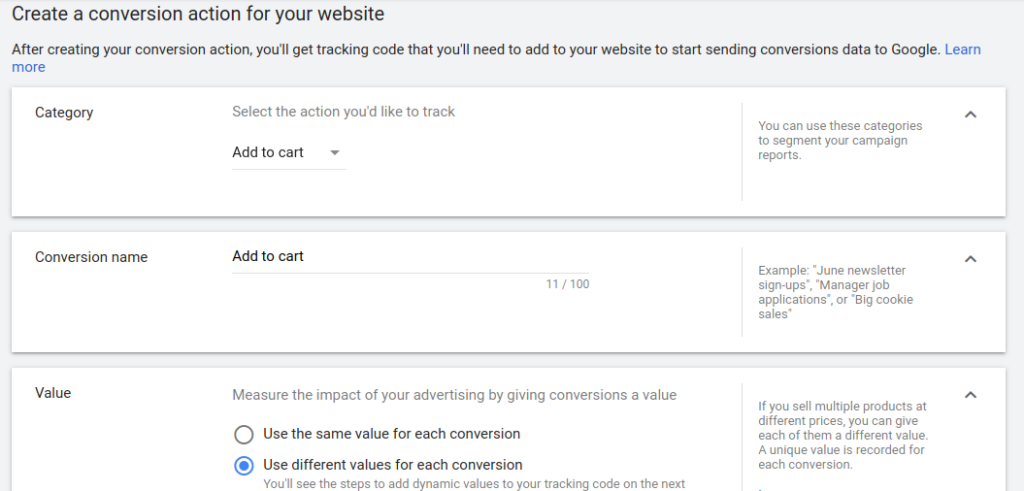
When you're through with the options, hit the ‘Create and Continue' button.
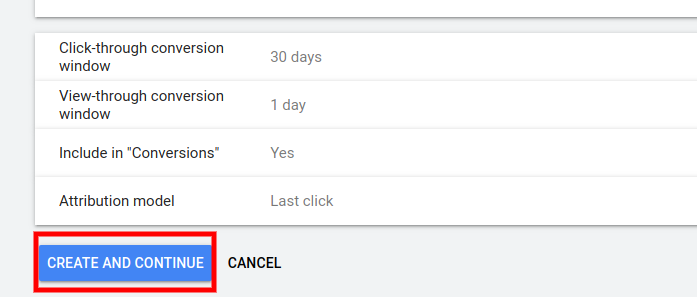
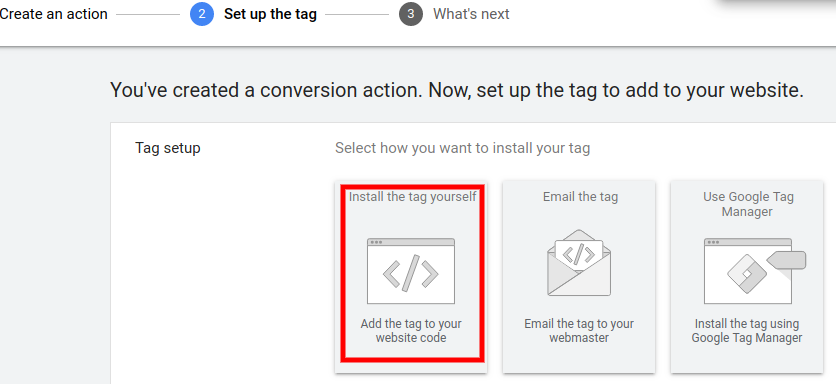
The box asking if you want to install the tracking code on your website will appear. Click the ‘Install the tag yourself' alternative now.
Next, select the option "The global site tag isn't installed on all your HTML pages." Then copy and paste the code appearing on your system's screen into a text editor such as Notepad.
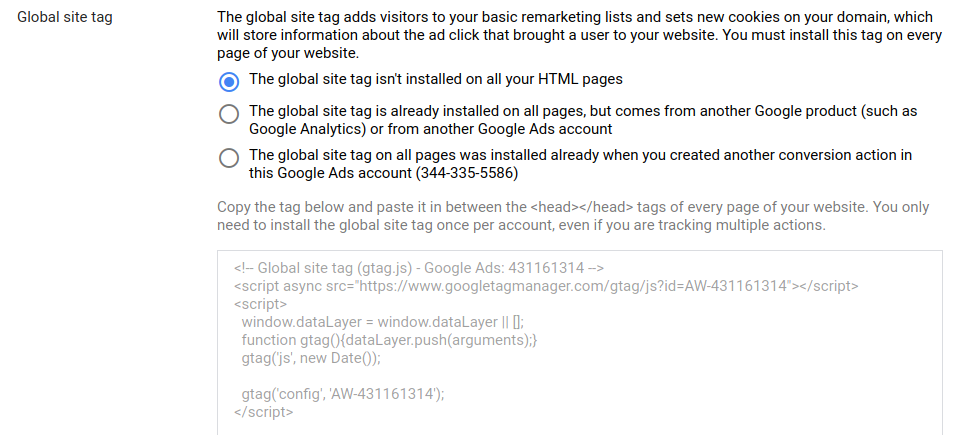
Now, Go to website admin.Install and enable the Headers and Footers Plugin. Once enabled, go to Settings, click on Insert Headers and Footers page.
Further, paste the earlier copied code to the header portion.
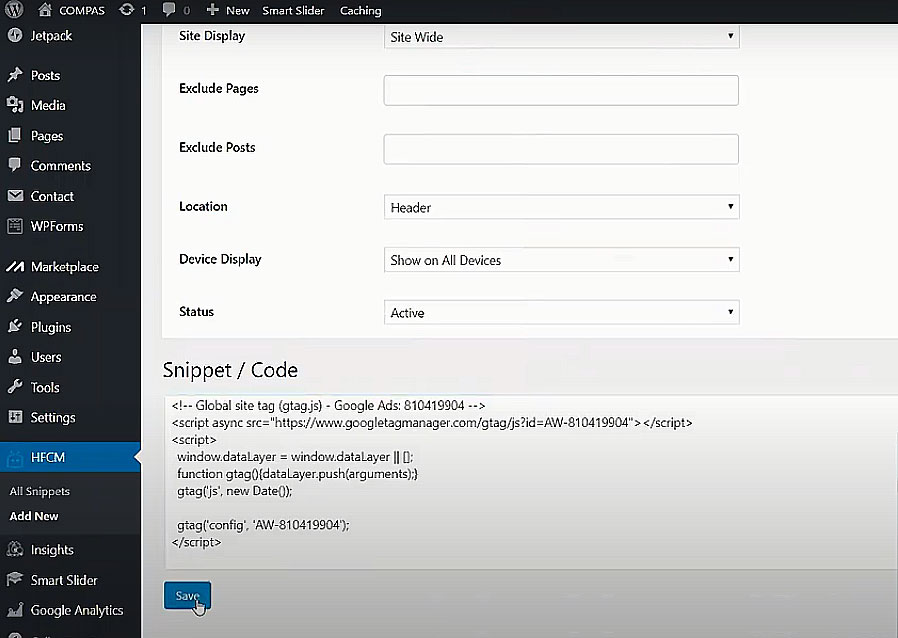
Now, simply save all these changes.
Using WordPress to track Facebook Conversions
With billions of users, we all know that Facebook is the most popular social media platform.
Statista puts it better: the Facebook platform experienced 2.7 billion users every month in the year 2018. This is why, in most cases, marketers rely on Facebook advertisements to reach their target demographic easily.
Now, let us say you use Facebook ads. You might also want to know the outcomes of your efforts. Conversion tracking for Facebook advertisements is the best way to go here.
Do you want to learn how to do it?
Read on our blog about how to add Facebook pixel to WordPress site.
Once you've installed the pixel to your site by using the above method, the next step is to set up the Facebook Pixel events.
Facebook Pixel Event Setup, follow below steps:
- Go to the Facebook Ads Manager Account
- Click on event manager & search for pixel that you have just setup.
- Press the ‘Open Event Setup tool’ choice. Now, pick the pixel ID and enter Settings.
- Under the setup tool, fill in the URL and press the Open Website option.
- A list of events suggested by Facebook will appear. Review all the events and click Confirm to choose or Dismiss to jump to the next event option.
- Hit the Finish Setup option to complete the event setup.
Ensure Facebook Pixel Functions With the Helper
- Download the Facebook Pixel Helper extension and install it on your device.
- Go to the page where you installed your extension.
- A popup will open, displaying the number of pixels available on your page as well as their proper functionality. If the functionality is hampered, a window displaying the error to be corrected will appear.
Create a Facebook Pixel Notification for Your WordPress Website
To comply with Facebook's standards and agreements, you must give a clear notice telling visitors or customers that their information is being collected. Cookies, among other things, can be used to collect information.
Examine Cookie Content Resource or use other business tools for more information.
Reviewing Facebook Conversion Tracking Reports
Facebook provides detailed insights and reporting for your Facebook pixels and advertising. All you need to do is go to Facebook Analytics and choose the pixel for which you want to track conversions.
Setting Up WordPress’s Twitter for Google Ads Tracking Conversions
Because of the large audience, many marketers are focusing on Twitter ads. Although it is not as popular as Facebook, it had 326 million monthly customers in 2018.
It's one thing to run the ads; the another comes to figure out if they're delivering the desired results.
To do so, open your Twitter Ads account.
Now go to Tools>Conversions tracking and click on it.
You'll be able to set up conversion tracking for your Twitter Ads this way.
Now, press the button that says "Generate website tag for conversion tracking."
A website tag code will appear on the next screen. Copy the code to your clipboard or paste it into any text editor on your system. Now, switch back to the admin panel of your WordPress website.
If you haven't already, enable the 'Insert Headers and Footers' plugin on your website. After that, paste the copied code into the header section and save the changes.
Conclusion
Finally, you will find that tracking conversions are not that daunting. Furthermore, numerous ways are available to set up conversion tracking for your WordPress website.
The next step it follows includes improvising these conversions for better outcomes. All these little efforts can have a significant impact on the business.
Hopefully, this guide will provide you with the right assistance in making your website up and running. Furthermore, you will have a greater knowledge of how to put these strategies into action.
If you don't want to use all of these options on your own, you can hire a custom WordPress development service to handle it for you. At WordSuccor, the experts follow the standard procedure that starts with:
- Identifying the WordPress website goals.
- Understanding the concept behind the goals.
- Developing the process of tracking the conversions on the WordPress site.
Our team of highly experienced specialists will explore every option for setting up the conversions, identify where improvements are needed, and implement those enhancements.