


Web Push Notification: How to Enable Them for WordPress Website?
One of the challenges of launching a WordPress website is getting visitors to come back from time to time. Even if your content is engaging, you need to find a way to engage and connect with your audience.
Here's what we will cover in this article. We will explain:
 Before heading directly towards the technicality behind, it is essential to back up the WordPress website. This must be followed before adding or removing the main features from the website (when something gets wrong).
To add the push notifications in WordPress, in this article, we will be using the OneSignal plugin. It is by no means the only WordPress tool that lets you customize push notifications. So, roll up your sleeves and get to work!
Before heading directly towards the technicality behind, it is essential to back up the WordPress website. This must be followed before adding or removing the main features from the website (when something gets wrong).
To add the push notifications in WordPress, in this article, we will be using the OneSignal plugin. It is by no means the only WordPress tool that lets you customize push notifications. So, roll up your sleeves and get to work!
 It is the best solution when it is about WordPress push notifications. The best part is that it is supportive of Android systems and desktop customers (Firefox, Safari, and Chrome).
After enabling, the visitors choose to get notifications every time you post the new post via the third party platform and WordPress editor.
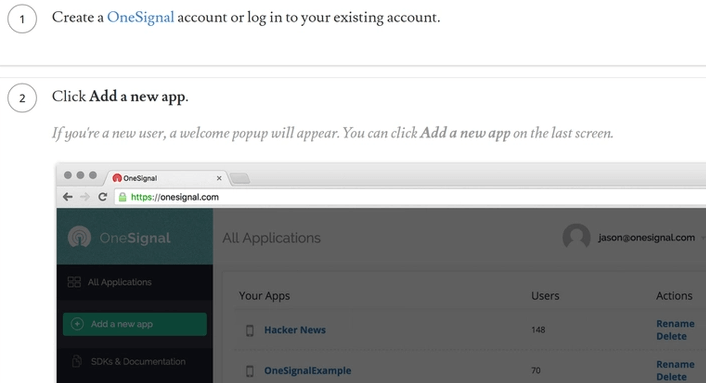
So, the first thing here is to install and activate the WordPress plugin.
It is the best solution when it is about WordPress push notifications. The best part is that it is supportive of Android systems and desktop customers (Firefox, Safari, and Chrome).
After enabling, the visitors choose to get notifications every time you post the new post via the third party platform and WordPress editor.
So, the first thing here is to install and activate the WordPress plugin.
 When it is completed, the One Signal Push Tab will be shown in the WordPress dashboard. Select it, and then, you will be navigated to the setup tab to complete plugin configuration. Go through the overview and then, move to the Firefox and Chrome push tab:
 The plugin has step by step guidelines for including both services, hence, it is irrelevant to repeat it here. Do follow the procedures of Firefox and Chrome and then, move to the Safari Push Tab if you like to include the notification as well.
It is to be noted that the Safari notifications work only on the macOS version. Considering all, let's add WordPress push notifications to the website.
The plugin has step by step guidelines for including both services, hence, it is irrelevant to repeat it here. Do follow the procedures of Firefox and Chrome and then, move to the Safari Push Tab if you like to include the notification as well.
It is to be noted that the Safari notifications work only on the macOS version. Considering all, let's add WordPress push notifications to the website.
 If you will automate the process, then, move to OneSignalPush->Configuration in the WordPress dashboard. Then, scroll down and find the Automatic Notification Settings section.
 Choose the first option as shown above. The notifications will be received by subscribers automatically every time you post a new post. Also, the default OneSignal logo can be replaced on the notifications with the post showing images by moving to the Sent Notification Settings section:
 After enabling the corresponding option, you are good to go. Now, you can configure the opt-in for the notifications.
 To Complete this, move back to OneSignal Push -> Configuration. Find out the Prompt Settings and Notify Button section inside.
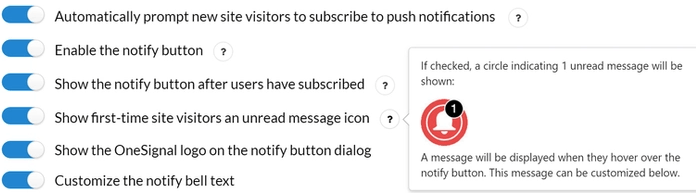 Turn on the settings "Automatically prompt new site visitors to subscribe to push notifications" which is located on the first on the list. Complete this and then, you can check the other settings.
The Notify button option, then, enables the small notification button on the bottom right corner of the website. This button allows users to find recent notifications.
Turn on the settings "Automatically prompt new site visitors to subscribe to push notifications" which is located on the first on the list. Complete this and then, you can check the other settings.
The Notify button option, then, enables the small notification button on the bottom right corner of the website. This button allows users to find recent notifications.
 Here, you can customize the way the visitors subscribe to the push notifications. The OneSignal Plugin provides a seamless way for customizing the prompt from different toggles and you can turn these toggles ON/OFF as per your liking.
 The position, theme, and size of the prompt can also get changed.
 The essential aspect of the push notification and its prompts is messaging and assures that it goes according to your brand. It makes the visitors feel willing to subscribe to the push notification.
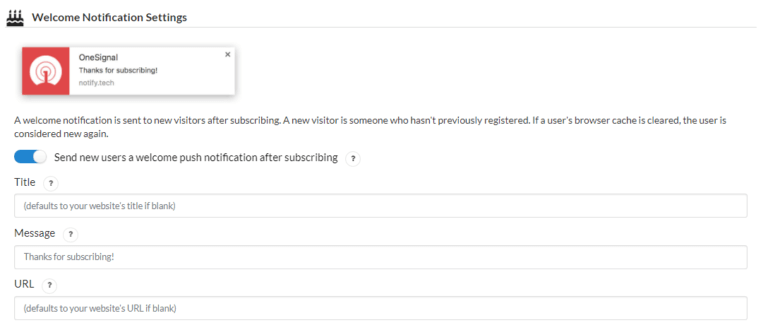
 The Welcome Notification Settings can also be customized.
 Select the New Push and then, you will be navigated to the New Message settings. Here, you can design and send the messages to the subscribers. So, the first thing here is to choose your audience.
 One Signal builds several segments of the visitors, therefore, you can either send the message to one segment or to the overall audience.
Else, the messages can be sent to the test device as well. From the audience, the one subscriber can be chosen to the test device that could be either you or anyone from the team. Additionally, it is the best idea to send the message to the test device before sending it to the list of subscribers.
The next thing is to design the message. Assure that the message title is engaging and the message depicts what the web push notification is all about.
One Signal builds several segments of the visitors, therefore, you can either send the message to one segment or to the overall audience.
Else, the messages can be sent to the test device as well. From the audience, the one subscriber can be chosen to the test device that could be either you or anyone from the team. Additionally, it is the best idea to send the message to the test device before sending it to the list of subscribers.
The next thing is to design the message. Assure that the message title is engaging and the message depicts what the web push notification is all about.
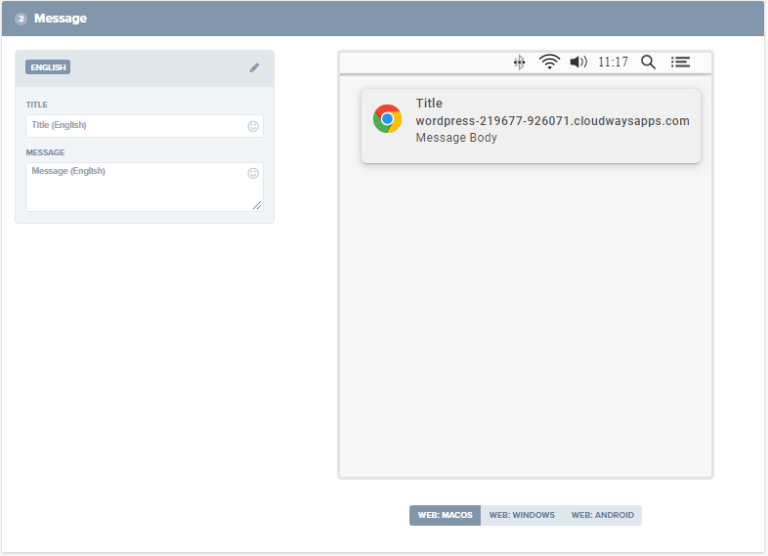 On the right side, you can check the preview of how the messages will be shown on mobile devices, windows, and macOS. After setting the title and the message, the next thing here is to set the images for the push notifications.
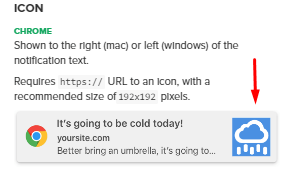
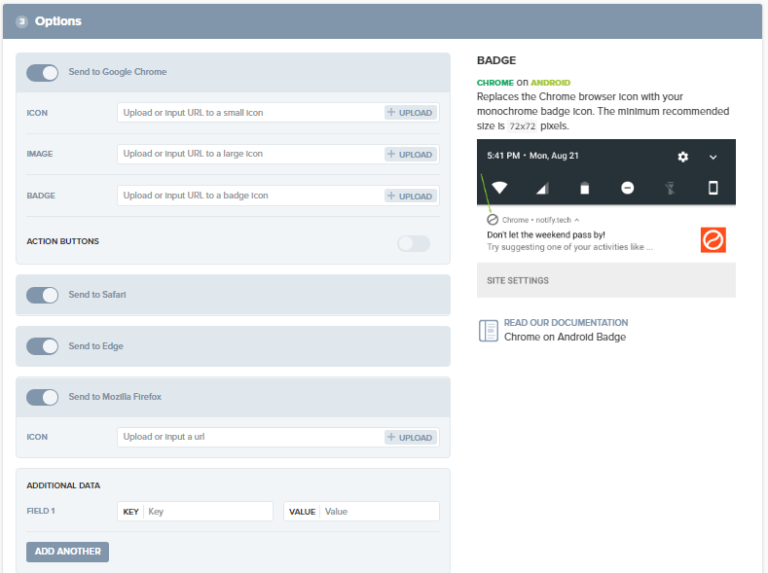 The Icon is the small images on the push notification with the message.
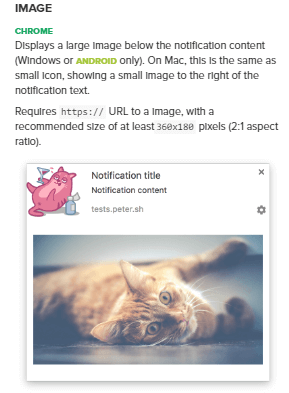
 The image is the huge image which is shown below the notification title.
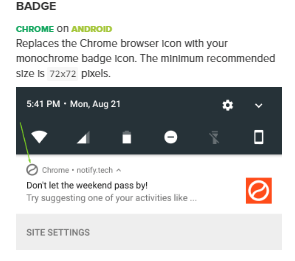
 The Badge is the small icon on the mobile screen beside your message.
 You can choose to send the message immediately to all the users at the same time.
Intelligent delivery delivers your message over a period of 24 hours at the time each user is most likely to be active. It increases your chances of a better click-through rate.
Optimize by user time zone lets you send messages at the same time no matter where the user is at that time.
After designing and scheduling the push notification, choose to Confirm to send the message.You can also save it to draft if you want to make more changes later.
You can choose to send the message immediately to all the users at the same time.
Intelligent delivery delivers your message over a period of 24 hours at the time each user is most likely to be active. It increases your chances of a better click-through rate.
Optimize by user time zone lets you send messages at the same time no matter where the user is at that time.
After designing and scheduling the push notification, choose to Confirm to send the message.You can also save it to draft if you want to make more changes later.
- What are the push notifications?
- Steps to add push notifications in WordPress
- Ways of customizing the WordPress push notification
- How to send the push notification message to the subscribers
Launch your Own WordPress Website today with WordSuccor
What are the Web Push Notifications?
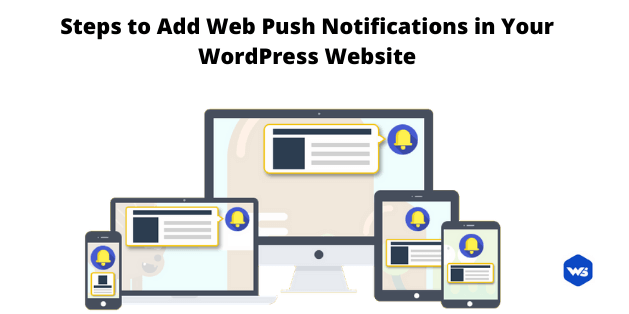
Push notifications are messages that appear on your screen to keep you informed when something is happening on your device. For example, when you receive an email, you probably see push notifications on both your smartphone and desktop PC. They are not as intrusive as pop-ups, and you can customize them when you want to receive them. Earlier, push notifications were limited to apps and system updates. However, websites are increasingly using this feature. Here are just a few of the reasons: The push notifications allow you to inform users about new content. With this, the users do not need to visit your website to see if you have published, for example, a new article. They can simply be notified when new content is available. Users can subscribe and unsubscribe from them. Unlike pop-ups, users can choose whether they want to receive push notifications. This means that only those who are interested can see them. They are very effective. Push notifications are more clickable, especially than other marketing methods. There are many benefits to using push notifications in WordPress. It is worth noting, though, that some users are not big fans of this feature. If you overuse push notifications, it can annoy your subscribers, which can lead to them not wanting to do anything with your site. To maintain a good balance, think about how you can interact with your followers. If you install an app that is sending you too many push notifications for no good reason, you probably end up uninstalling it. The same goes for websites, so you need to use notifications sparingly. That way, when your followers notice a message like this, they will know it is worth watching.Steps to Add Web Push Notifications in Your WordPress Website
Before heading directly towards the technicality behind, it is essential to back up the WordPress website. This must be followed before adding or removing the main features from the website (when something gets wrong).
To add the push notifications in WordPress, in this article, we will be using the OneSignal plugin. It is by no means the only WordPress tool that lets you customize push notifications. So, roll up your sleeves and get to work!
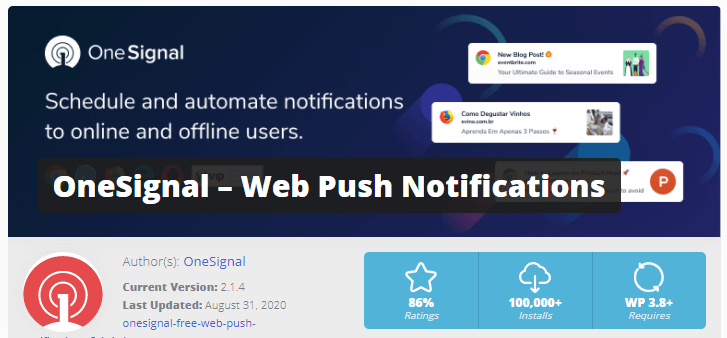
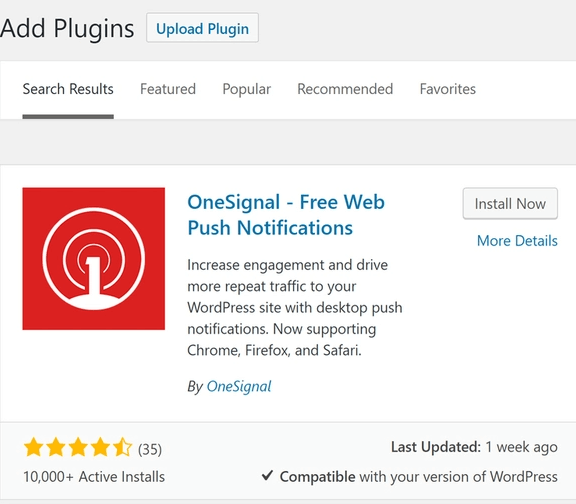
Step 1 Install the OneSignal Plugin
It is the best solution when it is about WordPress push notifications. The best part is that it is supportive of Android systems and desktop customers (Firefox, Safari, and Chrome).
After enabling, the visitors choose to get notifications every time you post the new post via the third party platform and WordPress editor.
So, the first thing here is to install and activate the WordPress plugin.
When it is completed, the One Signal Push Tab will be shown in the WordPress dashboard. Select it, and then, you will be navigated to the setup tab to complete plugin configuration. Go through the overview and then, move to the Firefox and Chrome push tab:
The plugin has step by step guidelines for including both services, hence, it is irrelevant to repeat it here. Do follow the procedures of Firefox and Chrome and then, move to the Safari Push Tab if you like to include the notification as well.
It is to be noted that the Safari notifications work only on the macOS version. Considering all, let's add WordPress push notifications to the website.
Step 2 Configure Automatic Notifications
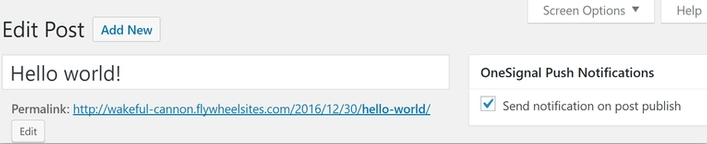
You must know the fact that One Signal WordPress push notification appears only when you post the content on the website. It includes custom posts and regular post types. It allows you to set up the notifications by selecting the box next to the WordPress editor on the posts manually.
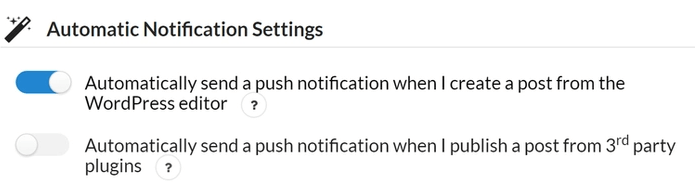
If you will automate the process, then, move to OneSignalPush->Configuration in the WordPress dashboard. Then, scroll down and find the Automatic Notification Settings section.
Choose the first option as shown above. The notifications will be received by subscribers automatically every time you post a new post. Also, the default OneSignal logo can be replaced on the notifications with the post showing images by moving to the Sent Notification Settings section:
After enabling the corresponding option, you are good to go. Now, you can configure the opt-in for the notifications.
Step 3 Include the Notification opt-in
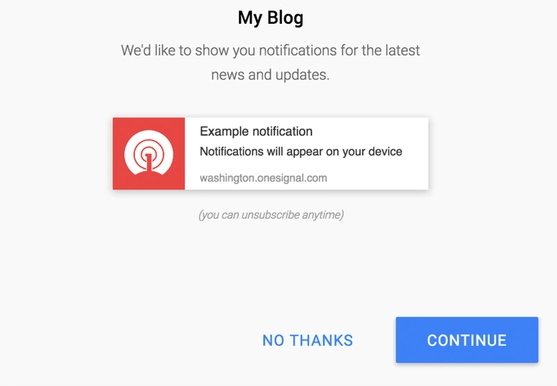
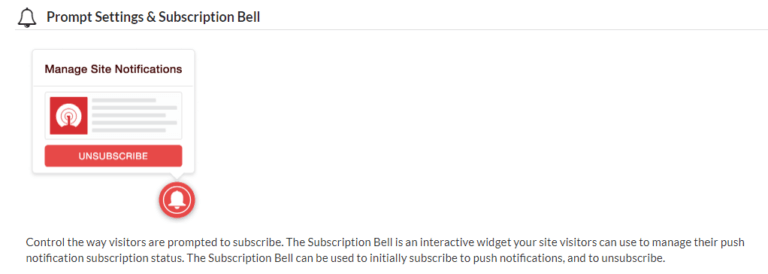
The WordPress push notifications are all set to move, however, there one option is still there for completion. The notifications have to opt into the program or need to be agreed upon before the users receive the notifications. Check out the image below to know how the One-Signal Opt-in appears on Safari:
To Complete this, move back to OneSignal Push -> Configuration. Find out the Prompt Settings and Notify Button section inside.
Turn on the settings "Automatically prompt new site visitors to subscribe to push notifications" which is located on the first on the list. Complete this and then, you can check the other settings.
The Notify button option, then, enables the small notification button on the bottom right corner of the website. This button allows users to find recent notifications.
Easy Ways of Customizing the WordPress Push Notification
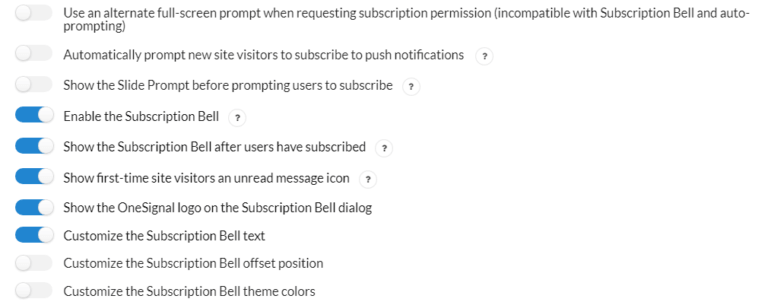
In case, you are not customizing the push notification, then, the WordPress developers will do it for you. They will use the OneSignal Plugin and make it send the general message to the user that does not appeal according to the brand's voice. Hence, to make changes to the push notifications, all you have to do is to move to OneSignal Push settings from the WordPress dashboard and then, choose the configuration. Move down to the Prompt Settings and the subscription bell.
Here, you can customize the way the visitors subscribe to the push notifications. The OneSignal Plugin provides a seamless way for customizing the prompt from different toggles and you can turn these toggles ON/OFF as per your liking.
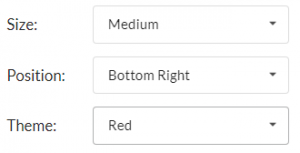
The position, theme, and size of the prompt can also get changed.
The essential aspect of the push notification and its prompts is messaging and assures that it goes according to your brand. It makes the visitors feel willing to subscribe to the push notification.
The Welcome Notification Settings can also be customized.
How to Send the Push Notification Message to the Subscribers?
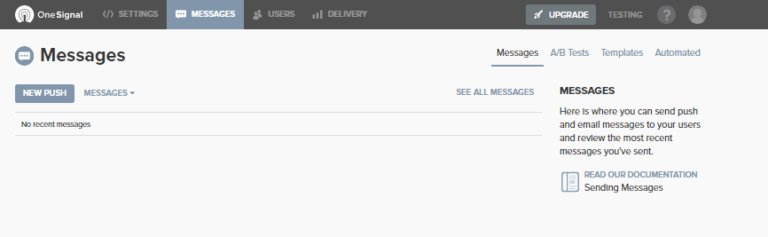
As of now, you have configured and customized the messages. Here, comes the to send the first push notification to the subscribers. For sending the push notifications, sign in to the One Signal account and then, navigate to messages.
Select the New Push and then, you will be navigated to the New Message settings. Here, you can design and send the messages to the subscribers. So, the first thing here is to choose your audience.
One Signal builds several segments of the visitors, therefore, you can either send the message to one segment or to the overall audience.
Else, the messages can be sent to the test device as well. From the audience, the one subscriber can be chosen to the test device that could be either you or anyone from the team. Additionally, it is the best idea to send the message to the test device before sending it to the list of subscribers.
The next thing is to design the message. Assure that the message title is engaging and the message depicts what the web push notification is all about.
On the right side, you can check the preview of how the messages will be shown on mobile devices, windows, and macOS. After setting the title and the message, the next thing here is to set the images for the push notifications.
The Icon is the small images on the push notification with the message.
The Badge is the small icon on the mobile screen beside your message.
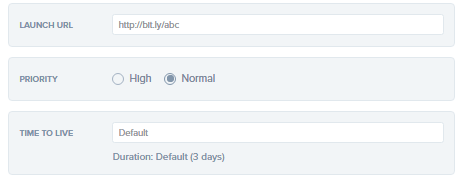
After setting the images, you have to enter the URL of the page or article for directing to the subscribers.
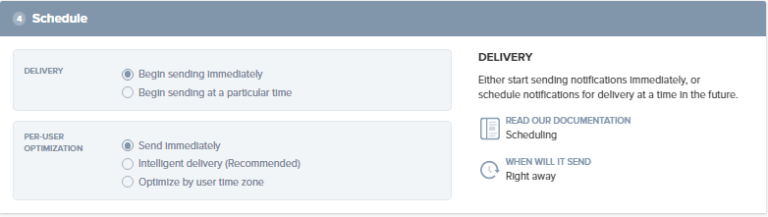
For sending the messages, set your preferences. It must be noted that if the subscriber's devices are offline for 259,200 seconds (3 days) then the notification will expire. In the Time to Live field, you can choose your own time frame window. The last step here is that you can schedule the push notification.
Per-User Optimization:
For more delivery optimization, you have more three options:
You can choose to send the message immediately to all the users at the same time.
Intelligent delivery delivers your message over a period of 24 hours at the time each user is most likely to be active. It increases your chances of a better click-through rate.
Optimize by user time zone lets you send messages at the same time no matter where the user is at that time.
After designing and scheduling the push notification, choose to Confirm to send the message.You can also save it to draft if you want to make more changes later.
Need Help to Enable Push Notification. Contact us Now