


How to Make a Custom Testimonials on WordPress [A Definitive Guide]
What according to you is the best way to improve your website conversion rate?
It is nothing but - displaying the feedback to potential customers with testimonials. To get the best results- all you have to choose the tools that are customized particularly for building and maintaining them.
But, getting the solutions with the proper combination of usability and features is a tough task. Hence, there are many plugins that can be used easily to build, manage, and feature customer testimonials.
Continuing that, here, in this article, we are revealing the best way to create the custom testimonials on WordPress. But, getting straight to the point, lets' first know the fundamentals of custom testimonials.
 Testimonials are known for improving the credibility of the service or product. Instead of having a long sales pitch, allow your customers to offer the products you recommend.
In this busy world, several purchasers are dependent more on what others have reviews about you. The testimonials are here to improve the sales when the purchaser is turn between different vendors and has not decided which one to choose. It could work as a recommendation that lets you choose the best bet.
Testimonials are known for improving the credibility of the service or product. Instead of having a long sales pitch, allow your customers to offer the products you recommend.
In this busy world, several purchasers are dependent more on what others have reviews about you. The testimonials are here to improve the sales when the purchaser is turn between different vendors and has not decided which one to choose. It could work as a recommendation that lets you choose the best bet.
 If you need, you can include the customer testimonials simply and manually to the pages and posts. Besides, this method will not give you a central location for managing it easily. You can also have to copy and paste every quote in a manual manner.
The best option is to leverage the tools created particularly for developing and managing the testimonials. It gives you automatic formatting and structuring and also, a choice to show them with the easy and simple sliding animation.
If you need, you can include the customer testimonials simply and manually to the pages and posts. Besides, this method will not give you a central location for managing it easily. You can also have to copy and paste every quote in a manual manner.
The best option is to leverage the tools created particularly for developing and managing the testimonials. It gives you automatic formatting and structuring and also, a choice to show them with the easy and simple sliding animation.
 The testimonial that hits the customer pain point is the great one. It should be the one who has an honest experience of how the services or products can solve their issues or assist them to be more effective. However, as small, it requires a title and should display the position, name, and business name. You could use an image to place the face of the person who has written it.
If you can ask them to record some video or audio, then it could be more better. Those testimonials that have facts and figures, can improve the marketing claims with solid evidence from third parties.
The testimonial that hits the customer pain point is the great one. It should be the one who has an honest experience of how the services or products can solve their issues or assist them to be more effective. However, as small, it requires a title and should display the position, name, and business name. You could use an image to place the face of the person who has written it.
If you can ask them to record some video or audio, then it could be more better. Those testimonials that have facts and figures, can improve the marketing claims with solid evidence from third parties.
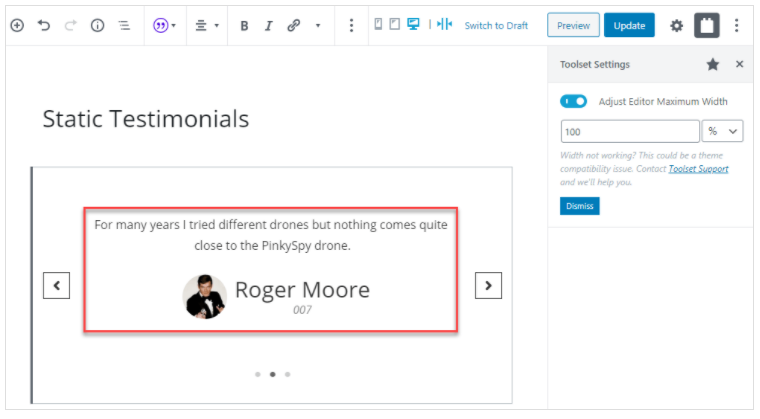 At this point, you have to include a new rotator before starting making the customer testimonials. Here, the aim of the rotator lies in grouping the testimonials and showing them in the carousels or sliders. For instance; you may like to show several groups of testimonials for different services you give.
Then, you like to use some details for the unique rotator, initiating with the name:
At this point, you have to include a new rotator before starting making the customer testimonials. Here, the aim of the rotator lies in grouping the testimonials and showing them in the carousels or sliders. For instance; you may like to show several groups of testimonials for different services you give.
Then, you like to use some details for the unique rotator, initiating with the name:
 Below the screen, you can choose the option for the unique rotator. It incorporates settings, like image sizes, transition effects, or if you like the testimonial display order randomized, and many more.
 The drop option for image size is essential if you like the images shown separately then theme permits for by default. Soon after that, the "Hide" options allow you to remove different rotator aspects:
 All of these changes can be created from the Widgets screen. The Select a Theme section provides you a choice among seven distinct themes. Just select the "Use" to select whichever option you like:
 After making the required changes, select the Publish button to assure to make them perpetual:
 The only option is the title field, where you can include the snippet from the testimonials. You will also require to fill in the full text of the testimonials in the main editor.
Know that if you have chosen the Hide Title Checkbox in the rotator setting on a prior basis, then this field is hidden in the testimonial slider.
The only option is the title field, where you can include the snippet from the testimonials. You will also require to fill in the full text of the testimonials in the main editor.
Know that if you have chosen the Hide Title Checkbox in the rotator setting on a prior basis, then this field is hidden in the testimonial slider.
 To the next, move down to the bottom on the screen. Here, you will have to choose the collapsible tabs in the Testimonials Image, Testimonial Order and the Testimonial Options:
 Here, the testimonial option section gives the three choices as given below:
 Select and drag it wherever you like it to display.
 After the widget is dropped in the appropriate location, you will have to customize more of the settings. The first is to start the title. It could be anything you select, like, “What Our Customers Are Saying” or “Customer Testimonials":
 The limit field allows you to define a maximum number of testimonials to show on the page. Showing several testimonials to slow the website.
The display field allows you to choose how you like the testimonials formatted. The list display does not come without animations, and every content is displayed every time. The Rotator display type has the slider that uses the animation.
The "Show" option determines if or not you like to show the full testimonial or an excerpt. If you like to display an excerpt, however, none is discovered, it has to be created automatically from the beginning to the testimonial.
Custom Excerpt Length allows you to select how long the excerpt selected above will be. It counts the characters and in words. In the last, when you want to examine the increase display settings you can choose Override Rotator Settings option.
The limit field allows you to define a maximum number of testimonials to show on the page. Showing several testimonials to slow the website.
The display field allows you to choose how you like the testimonials formatted. The list display does not come without animations, and every content is displayed every time. The Rotator display type has the slider that uses the animation.
The "Show" option determines if or not you like to show the full testimonial or an excerpt. If you like to display an excerpt, however, none is discovered, it has to be created automatically from the beginning to the testimonial.
Custom Excerpt Length allows you to select how long the excerpt selected above will be. It counts the characters and in words. In the last, when you want to examine the increase display settings you can choose Override Rotator Settings option.
 It is practical for mentioning a few of the common settings with the rotator, and overriding as required for every testimonial group you build.
 In the below section of the post editor, you can notice the testimonial information meta box. They can access information, Email address, Customer name, Rating and many more.
After you have chosen the crucial details, post the testimonial and you can check it live.
In the below section of the post editor, you can notice the testimonial information meta box. They can access information, Email address, Customer name, Rating and many more.
After you have chosen the crucial details, post the testimonial and you can check it live.
 To build many testimonials the process can be repeated whenever needed. Then, you can show them on the post or page with the WordPress Block Editor. In case any issue occur, report to the WordPress plugin developer they will help you to fix it.
 You can select the Single testimonial to show one piece of content, Testimonials List for a longer selection, Random Testimonial to show a random one, Testimonials Cycle for a slider, to show them in the table format. Check out below how the grid looks like:
 Check that Easy Testimonials plugin is more extensive than the Testimonial Rotator. You can also like to find the available options, to familiarize yourself with them and assures tweaks to fulfill the appropriate requirements:
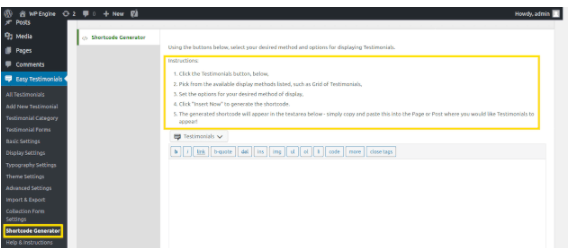
 Like, you can select to show the testimonials with the short coders despite blocks. To carry this out, move to Easy testimonials -> Shortcode Generator. Go through the instructions on the screen to get the shortcode, that you can copy and paste anywhere you like the testimonials to emerge:
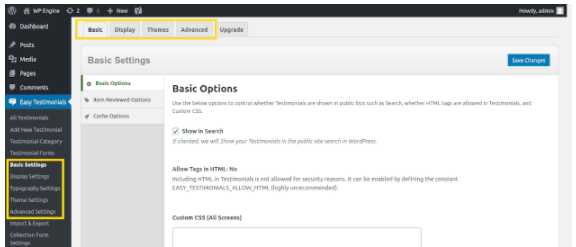
 There are many options, like leveraging CSS for customizing the appearance of the testimonials, or, also, making a form for getting them from the customers. More of the extra features are free, whereas another may need to require an upgrade to the premium version.
How Testimonials are Important for your Business?
Testimonials are known for improving the credibility of the service or product. Instead of having a long sales pitch, allow your customers to offer the products you recommend.
In this busy world, several purchasers are dependent more on what others have reviews about you. The testimonials are here to improve the sales when the purchaser is turn between different vendors and has not decided which one to choose. It could work as a recommendation that lets you choose the best bet.
What is the Importance of Custom Testimonials?
If you need, you can include the customer testimonials simply and manually to the pages and posts. Besides, this method will not give you a central location for managing it easily. You can also have to copy and paste every quote in a manual manner.
The best option is to leverage the tools created particularly for developing and managing the testimonials. It gives you automatic formatting and structuring and also, a choice to show them with the easy and simple sliding animation.
How to Create a Great Testimonial?
The testimonial that hits the customer pain point is the great one. It should be the one who has an honest experience of how the services or products can solve their issues or assist them to be more effective. However, as small, it requires a title and should display the position, name, and business name. You could use an image to place the face of the person who has written it.
If you can ask them to record some video or audio, then it could be more better. Those testimonials that have facts and figures, can improve the marketing claims with solid evidence from third parties.
How to Create Custom Testimonials with WordPress Plugins
Many plugins are there that offer outstanding features and functionalities to build the custom testimonials. Testimonial Rotator, Strong Testimonials, Easy Testimonials, Testimonials Widget, etc. are some of those plugins. The functioning of every plugin is different from the other. Find out below of those examples:Testimonial Rotator
First of all, let's find out how to make the custom testimonials shown as a slider with the Testimonial rotator plugin.Step 1# Include a Rotator
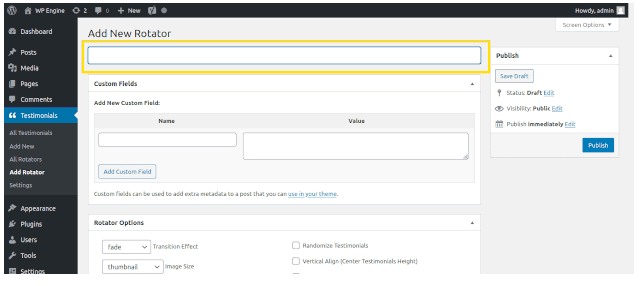
You need to initiate by installing and activating the testimonial rotator plugin. After it is completed, move to testimonials->Add rotator.
At this point, you have to include a new rotator before starting making the customer testimonials. Here, the aim of the rotator lies in grouping the testimonials and showing them in the carousels or sliders. For instance; you may like to show several groups of testimonials for different services you give.
Then, you like to use some details for the unique rotator, initiating with the name:
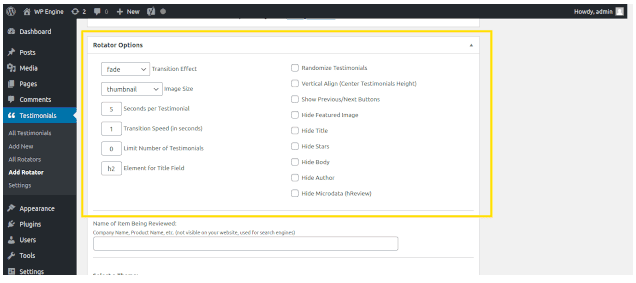
Below the screen, you can choose the option for the unique rotator. It incorporates settings, like image sizes, transition effects, or if you like the testimonial display order randomized, and many more.
The drop option for image size is essential if you like the images shown separately then theme permits for by default. Soon after that, the "Hide" options allow you to remove different rotator aspects:
All of these changes can be created from the Widgets screen. The Select a Theme section provides you a choice among seven distinct themes. Just select the "Use" to select whichever option you like:
After making the required changes, select the Publish button to assure to make them perpetual:
Need Custom WordPress plugin Support? Get in touch with us
Step 2# Include testimonials to the rotator
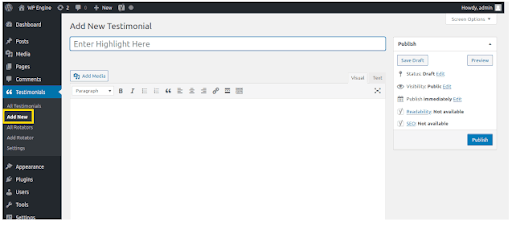
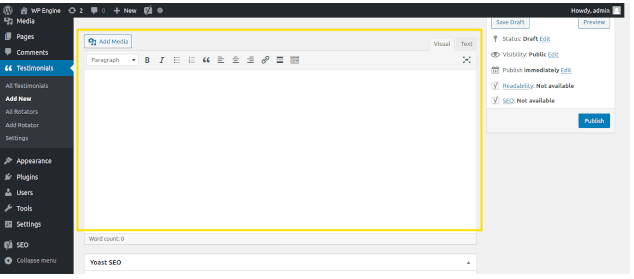
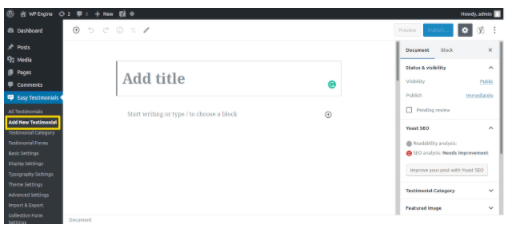
The next step is to include testimonials. To commence, move to Testimonials-> Add new.
The only option is the title field, where you can include the snippet from the testimonials. You will also require to fill in the full text of the testimonials in the main editor.
Know that if you have chosen the Hide Title Checkbox in the rotator setting on a prior basis, then this field is hidden in the testimonial slider.
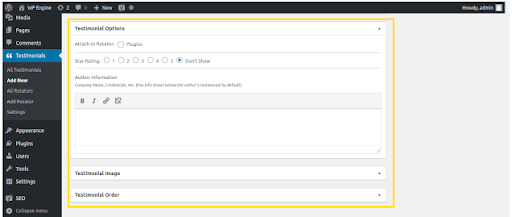
To the next, move down to the bottom on the screen. Here, you will have to choose the collapsible tabs in the Testimonials Image, Testimonial Order and the Testimonial Options:
Here, the testimonial option section gives the three choices as given below:
- Rotator Attachment
- Star Rating
- Author Information
Facing issues in your Website. Talk to our Experts Now
Step 3# Show the Testimonials
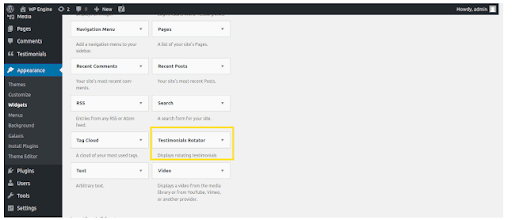
In the end, you have to show the testimonials you have built. Move to Appearance-> Widgets and know the Testimonial Rotator Option.
Select and drag it wherever you like it to display.
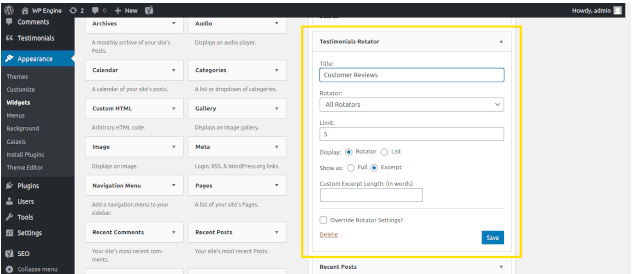
After the widget is dropped in the appropriate location, you will have to customize more of the settings. The first is to start the title. It could be anything you select, like, “What Our Customers Are Saying” or “Customer Testimonials":
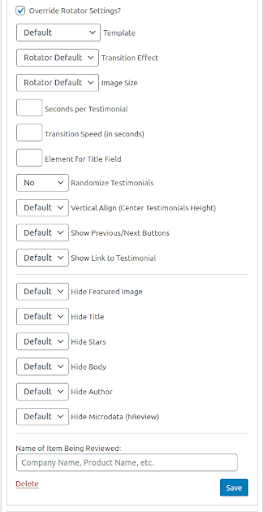
The limit field allows you to define a maximum number of testimonials to show on the page. Showing several testimonials to slow the website.
The display field allows you to choose how you like the testimonials formatted. The list display does not come without animations, and every content is displayed every time. The Rotator display type has the slider that uses the animation.
The "Show" option determines if or not you like to show the full testimonial or an excerpt. If you like to display an excerpt, however, none is discovered, it has to be created automatically from the beginning to the testimonial.
Custom Excerpt Length allows you to select how long the excerpt selected above will be. It counts the characters and in words. In the last, when you want to examine the increase display settings you can choose Override Rotator Settings option.
It is practical for mentioning a few of the common settings with the rotator, and overriding as required for every testimonial group you build.
Easy Testimonials
Now walk via displaying the custom testimonials with the Easy Testimonial Plugin. You can initiate by installing and activating it and then, you will be willing to jump directly.Step 1# Build the Testimonials
First, move to Easy Testimonials-> Add new testimonials to build the testimonial. It can open the WordPress editor. The testimonials can be structured as same as page or post.
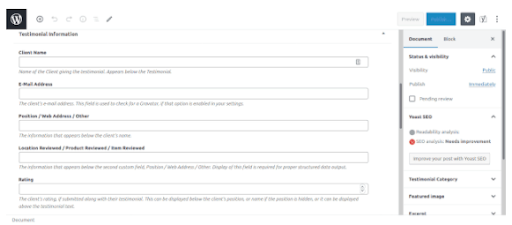
In the below section of the post editor, you can notice the testimonial information meta box. They can access information, Email address, Customer name, Rating and many more.
After you have chosen the crucial details, post the testimonial and you can check it live.
To build many testimonials the process can be repeated whenever needed. Then, you can show them on the post or page with the WordPress Block Editor. In case any issue occur, report to the WordPress plugin developer they will help you to fix it.
Step 2# Show the Testimonials
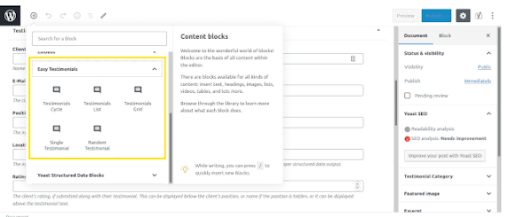
Here, open the post or page on the plus icon to include a new block from the Easy Testimonial Plugin. You will check that there is almost five display type to select:
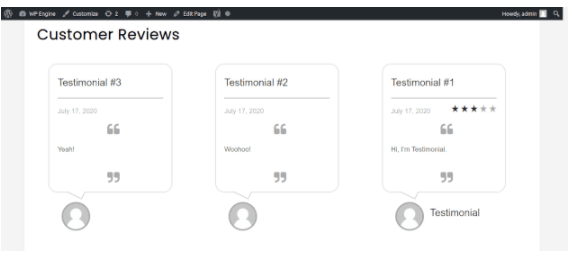
You can select the Single testimonial to show one piece of content, Testimonials List for a longer selection, Random Testimonial to show a random one, Testimonials Cycle for a slider, to show them in the table format. Check out below how the grid looks like:
Check that Easy Testimonials plugin is more extensive than the Testimonial Rotator. You can also like to find the available options, to familiarize yourself with them and assures tweaks to fulfill the appropriate requirements:
Like, you can select to show the testimonials with the short coders despite blocks. To carry this out, move to Easy testimonials -> Shortcode Generator. Go through the instructions on the screen to get the shortcode, that you can copy and paste anywhere you like the testimonials to emerge:
There are many options, like leveraging CSS for customizing the appearance of the testimonials, or, also, making a form for getting them from the customers. More of the extra features are free, whereas another may need to require an upgrade to the premium version.