


How to Setup and Launch LMS Website with WordPress – The Definitive Guide
Starting a new business takes a lot of investment and in-depth know-how. Nowadays, several businesses are trying their hand in creating a robust WordPress Learning Management System (LMS).
It allows the businesses to provide online classes, reaching several students and also, open the ways to earn money. Many have experienced a huge Return On Investment (ROI) in profit.
The studies have revealed that selling LMS type websites is a successful business idea that does not demand any type of technical knowledge. It assures all your spending in control.
When it is about building a new website, the first thing that crosses our mind is choosing the right platform.
While looking at the statistics, we assure you that there is no better platform than WordPress overall. It powers 34% of all internet with 60.8% of market share. This Content management system can be customized easily according to the fundamentals. The WordPress community constantly maintains and optimizes the WordPress core.
Coming back to the point, if you are looking for the perfect ways to create a learning management system website, then you are on the right page!! Stay with us and keep on reading!!
 Several website builder tools are there in the market that can be used to create the website. Besides, here, our recommendation is to use WordPress CMS. It provides you the freedom and flexibility to customize the website according to your needs.
In case, you do not have the WordPress installed, then do it right now. It is not a lengthy or complex process, you can complete it in some minutes only. First and foremost, login to the web host’s cPanel.
From the "Databases", you will find out "MySQL Database Wizard". Consider this wizard to build the MySQL database and a database user. All these steps are very simple to carry out.
And, if you have bought the WordPress hosting service, then, you will find out the WordPress installation wizard in the cPanel. From this wizard, you will know the ways to install WordPress.
If this is not the case, then, you have to follow the manual way to install WordPress.
Several website builder tools are there in the market that can be used to create the website. Besides, here, our recommendation is to use WordPress CMS. It provides you the freedom and flexibility to customize the website according to your needs.
In case, you do not have the WordPress installed, then do it right now. It is not a lengthy or complex process, you can complete it in some minutes only. First and foremost, login to the web host’s cPanel.
From the "Databases", you will find out "MySQL Database Wizard". Consider this wizard to build the MySQL database and a database user. All these steps are very simple to carry out.
And, if you have bought the WordPress hosting service, then, you will find out the WordPress installation wizard in the cPanel. From this wizard, you will know the ways to install WordPress.
If this is not the case, then, you have to follow the manual way to install WordPress.
 After entering the data, select the "Update License" button for storing the settings. ext. Here, you have to move to the "PayPal Settings" tab. Now, you will fill in the PayPal information to market the courses and accept online payments.
 Keep in mind to select the "Save" button for storing all of the settings.
** LearnDash includes the 2Checkout and Stripe payment options in the Add-ons. That can also be used if the Paypal is not considered.**
When configuring the primary settings, the WordPress LMS plugin is ready for use, and now, you can start building courses.
Keep in mind to select the "Save" button for storing all of the settings.
** LearnDash includes the 2Checkout and Stripe payment options in the Add-ons. That can also be used if the Paypal is not considered.**
When configuring the primary settings, the WordPress LMS plugin is ready for use, and now, you can start building courses.
 Initially, you have to make a title and explanation of the quiz.
 Right after this, move to the settings tab and include the quiz to a lesson, course, or topic.
 Under this, there are many options to get the quiz marks, pre-requisites, display settings, and certificates.
 After completion, select the publish or save button for saving the quiz.
The quiz does not have anything right now. So, you can change it by integrating a few questions here. Move to LearnDash LMS -> Questions page and then, select the Add New button.
After completion, select the publish or save button for saving the quiz.
The quiz does not have anything right now. So, you can change it by integrating a few questions here. Move to LearnDash LMS -> Questions page and then, select the Add New button.
 Select the answer type of question from the right column. According to the answer type, the question choices also get changed.
 Next, you can insert the answer choices. You have an option here to choose the message to be shown on the right answer.
When all this completes, move to the Settings tab and integrate the question to the quiz made earlier.
Next, you can insert the answer choices. You have an option here to choose the message to be shown on the right answer.
When all this completes, move to the Settings tab and integrate the question to the quiz made earlier.
 Keep in mind to click on the Save button before moving to add the other question. You can integrate as many questions as you want to in the quiz.
 Later, the assignment guidelines for the lesson can be provided. When the lesson finishes, the users will notice an option for uploading the assignment.
 After uploading the assignments to all users, you can check them by navigating to LearnDash LMS ->Assignments page.
 This page allows you to update the assignments, accept them, or provide comments on given assignments.
 It will take you to the certificate edit screen. From this page, you can set the background image, you can download the same as the featured image.
Next, you have to use the visual editor. For that, select the shortcodes button to include the LearnDash metadata to the certificate. From the shortcode, including the user name, course title, and other data.
It will take you to the certificate edit screen. From this page, you can set the background image, you can download the same as the featured image.
Next, you have to use the visual editor. For that, select the shortcodes button to include the LearnDash metadata to the certificate. From the shortcode, including the user name, course title, and other data.
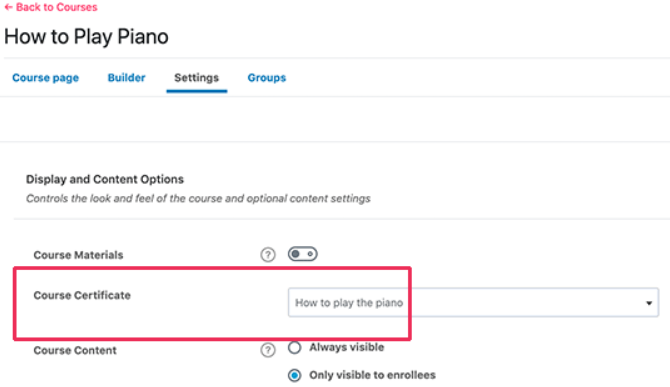
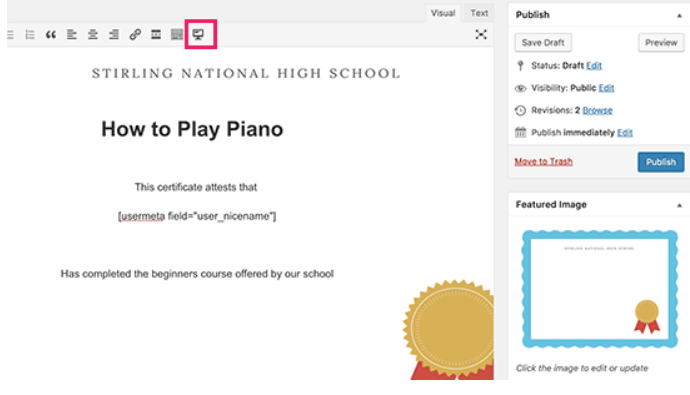 When you are ok with the certificate, publish it. Now, include that certificate to the lesson, course, and quiz. Like; the certificate can be issued on the course completion, after the quiz completion and concluding the lesson.
For adding the certificate, change the lesson, course, and quiz and move to the settings tab. You can choose the created certificate from here.
When you are ok with the certificate, publish it. Now, include that certificate to the lesson, course, and quiz. Like; the certificate can be issued on the course completion, after the quiz completion and concluding the lesson.
For adding the certificate, change the lesson, course, and quiz and move to the settings tab. You can choose the created certificate from here.
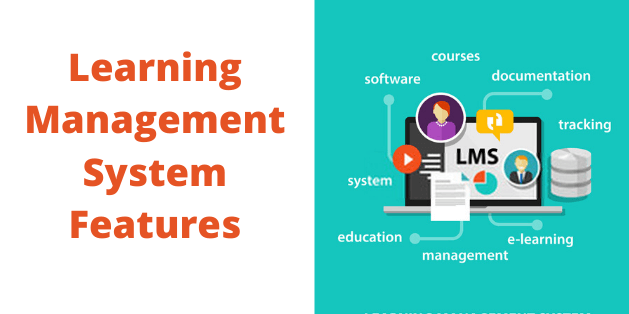
What is the Learning Management System (LMS)?
Precisely, the Learning Management System is a website that hosts the eLearning programs and offers employees or students access to participate in all online training sessions. LMS constitutes several exceptional features for online training. When you have decided to create the Learning Management System for your business, then the first and foremost step is to outline what you require on the website. Right after that, start researching the available options you have. The quality Learning Management System will:- Present you with the means required to post lessons that carry different content types.
- Allow students or employees to sign up for special classes or courses.
- Enable you to track student development and carry out evaluations easily.
Learning Management System Features
# Course Creation
Perhaps the most essential function of the LMS is the capacity to take courses that satisfy your organization's aims. It has the ability to perform various types of course categories and build quizzes, lessons, assignments, and topics for your students.# Reporting
If you are concerned regarding the learning plan and the students involved, then it is very necessary to track the detailed information and data around the platform. A sophisticated Learning Management System platform enables you to track the progress of learners, integrating how long it took the learners to take personal assignments or quizzes and every quiz trial, and the strength to get comprehensive reports. It gives you a clear visual record of your student/staff performance. The WordPress LMS dashboard permits you to inspect complete data, like; the number of assignments and courses (completed and incomplete) and the number of students in a specific program. In addition, this management system gives you the authority to use filters to find the specific views of the data, such as the registered students and their progress with every course. Through extensive reports, you can have an in-depth understanding of LMS and you can find out how learners use the program.# Administration
Presenting a learning platform online is of great importance to the business, but it is also important to hold tools that can be used to control the process. Hence, while creating LMS, you must watch-out all features, like, a powerful email notification process for learner participation, group management, user profiles, clearing data, exam expiration, distributing rewards and grades.# Content Management
Whether the Learning Management System is used or not, the content is critical to any website. Though, while using WordPress to create a learning management system, you must understand that it is a content management system that generates content to match with the all offering of LMS.# Systems Integration
Excellent LMS systems will be blended into existing programs, such as billing systems or human resources information systems. WordPress has a fairly powerful Application Program Interface to integrate with third-parties. So, find out the LMS system, such as LearnDash to match with the integration of systems such as Zapier, Stripe, Slack, MailChimp, Adobe Captivate, and Articulate Storyline, etc.# Automated Communication
Great communication requires a lot of management time and expenses to be completed. An excellent Learning Management System gives you the functions and tools that are required to simplify communication. Features, like, desktop notifications and applications can provide your users with visual alerts (inside the application and browser) to remind them of tentative progress, as well as automatic notifications related to courses, accounts, and their progress. These all are the keys to have the best learning experience overall. A properly set up active and reliable email notification system can save a lot of time for website administration.# Social Community Implementation
When using WordPress to create a learning management system, there are many methods to achieve a community experience for your learners and employees. Despite this, if it is about the private intranet, the users may acknowledge the extra effort you are putting in to create the system as a social community.# Multiple Language Support
According to the audience's need, you may need or want to implement different language options for the platform. Even though English is the default language of the WordPress Content Management System, it is also broadened for various world languages. Language translation files are there to create a website that provides multiple language versions# Monetization/eCommerce
Few businesses leverage LMS and WordPress integration to increase onboarding and training needs for existing users, like, existing employees or new employees. Nevertheless, some organizations build online learning courses for their profit and like to take profitable results from the published courses.Hire our expert developers to receive instant help to launch WordPress LMS website
6 Simple Steps to Create a Learning Management System Website with WordPress
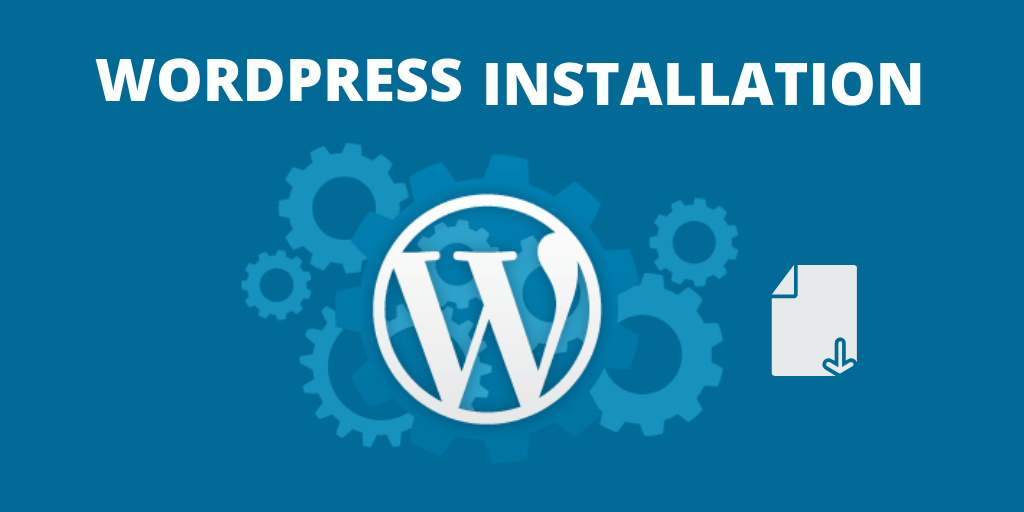
Step 1# Set Up WordPress
Several website builder tools are there in the market that can be used to create the website. Besides, here, our recommendation is to use WordPress CMS. It provides you the freedom and flexibility to customize the website according to your needs.
In case, you do not have the WordPress installed, then do it right now. It is not a lengthy or complex process, you can complete it in some minutes only. First and foremost, login to the web host’s cPanel.
From the "Databases", you will find out "MySQL Database Wizard". Consider this wizard to build the MySQL database and a database user. All these steps are very simple to carry out.
And, if you have bought the WordPress hosting service, then, you will find out the WordPress installation wizard in the cPanel. From this wizard, you will know the ways to install WordPress.
If this is not the case, then, you have to follow the manual way to install WordPress.
- First of all, download the newest version of WordPress. Then, extract the zip file contents.
- Then, you need to upload every file to the web host. For carrying out the process of uploading files, generate the FTP account. From the cPanel, in the File section, you will find the FTP Accounts. This option can be used to build the FTP account.
- From the FTP client of your preference, the WordPress files will be uploaded.
- Link the web host from the FTP account that you have built. Form the public_html, copy every file form the WordPress folder. Here, choose and upload every content, do not copy the entire folder.
Step 2# Install a Theme
After setting up WordPress, the next step is to start the process of theme installation. The chosen theme defines the intention behind the website, so it has to be done sensibly. Here, you need to look after the overall website layout not only on the colors. The thing that matters here is the chosen theme behaves properly with Learn Dash. What's better is to go with the LearnDash theme. There are several LearnDash centric themes available. After deciding the theme, the installation becomes an easy task with the below steps:- Sign to your WordPress admin panel.
- Move to Appearance -> Themes, and select Add New.
- Consider the Upload option for uploading the zipped copy of the theme.
- Activate it now.
Get pixel perfect WordPress theme customization Today
Step 3# Install and Setup LearnDash LMS Plugin
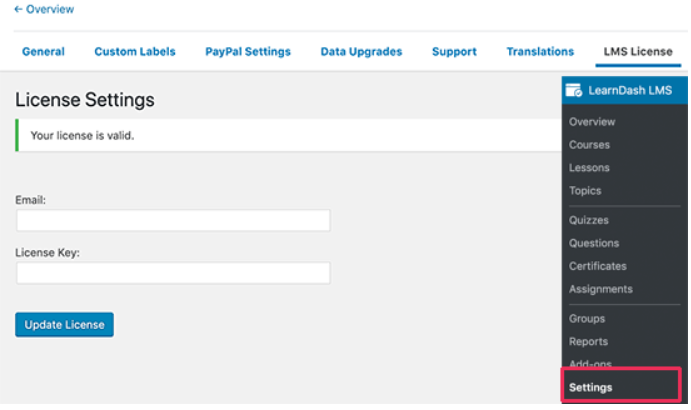
Now, you have to install and set up the WordPress LMS plugin. It enables you to build online courses and integrate them into the WordPress website. First and foremost, you have to install and activate the LearnDash plugin. **LearnDash is the most suitable Learning Management System plugin in the WordPress repository**. It is a complete solution with full course management, course progress, quizzes, assignments, lesson planning, etc. After completing the process of activation, visit the LearnDash LMS-> Settings page and then select the LMS License tab to access your license key and email address.
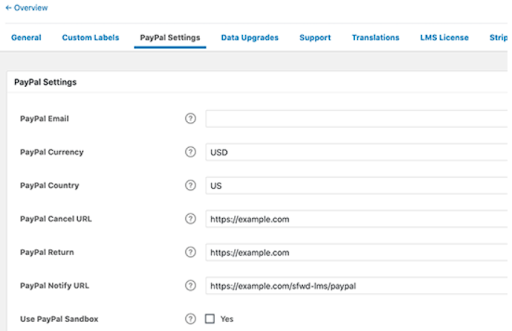
After entering the data, select the "Update License" button for storing the settings. ext. Here, you have to move to the "PayPal Settings" tab. Now, you will fill in the PayPal information to market the courses and accept online payments.
Keep in mind to select the "Save" button for storing all of the settings.
** LearnDash includes the 2Checkout and Stripe payment options in the Add-ons. That can also be used if the Paypal is not considered.**
When configuring the primary settings, the WordPress LMS plugin is ready for use, and now, you can start building courses.
Step 4# Set Up Lessons on LearnDash
Lesson Settings
You can start by carrying out the below settings:- Move to LearnDash LMS -> Lessons
- Select the Settings tab
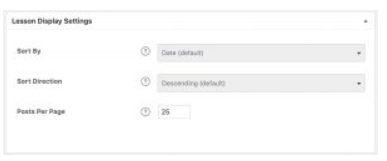
Lesson Display Settings
- Pick a Sort By option - Date (default) -Title - Menu Order
- Pick a Sort Direction -Descending (default) -Ascending
- Determine the number of Posts Per Page you want to show
Lesson Access Settings
- Move to LearnDash LMS -> Lessons
- Select the lesson that you like to edit
- Select the "Settings" tab from the top of the page
- Place the section titled “Lesson Access Settings”
- Associated Course: Choose the course of which is a part of the lesson.
- Sample Lesson – If this choice is selected, the course is accessible to students even if the course gets paid.
- Lesson Schedule – The lesson gets accessible at some particular time as well. Generally, this option can make every lesson accessible to the users right after publishing the post.
Planning a Lesson
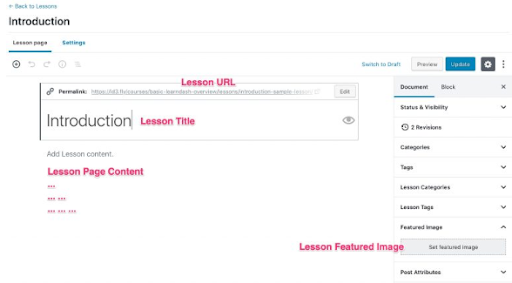
To start planning the lesson on the LearnDash, follow the below points:- Move to LearnDash LMS -> Lessons
- Select the lesson you want to edit or select the Add New button
- It will take you the Lesson page tab automatically
Step 5# Adding Quizzes and Assignments to LMS
The assignment and quizzes enable you to provide the best learning experience. The LearnDash WordPress LMS plugin has all the dynamic assignments and quizzes in its pocket that can be integrated into the lessons and courses. The assignments and quizzes can be made available to the users before they initiate the next course or lesson. Accordingly, you can evaluate the assignments and provide feedback to the learners.Creating Quizzes in LearnDash
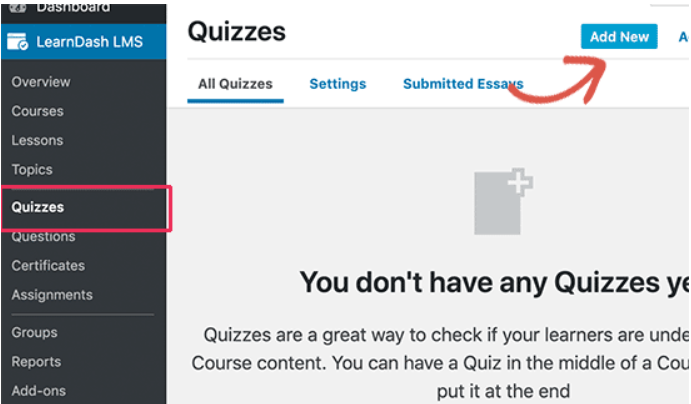
For adding the quiz, move to the LearnDash LMS -> Quizzes page and select the Add New button.
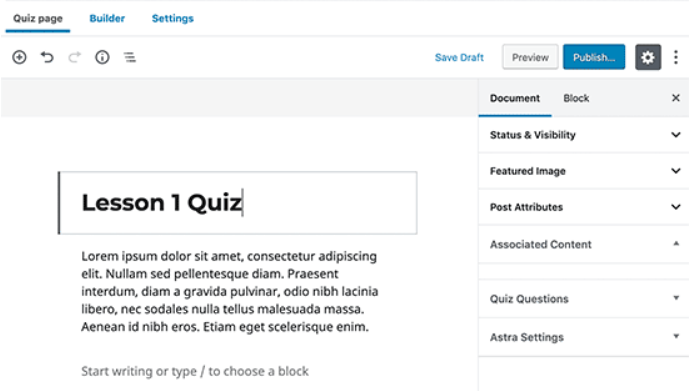
Initially, you have to make a title and explanation of the quiz.
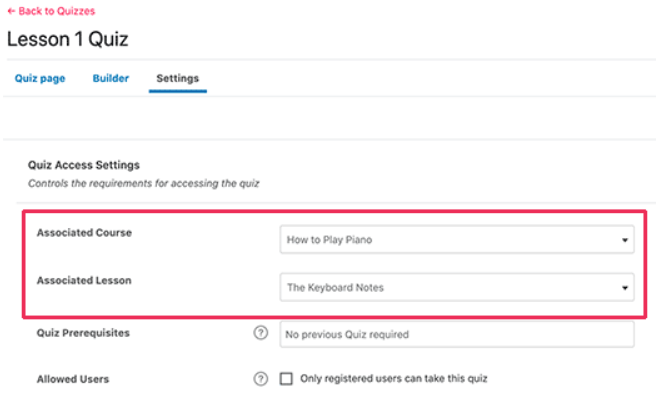
Right after this, move to the settings tab and include the quiz to a lesson, course, or topic.
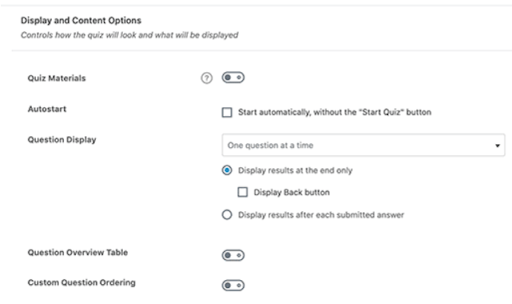
Under this, there are many options to get the quiz marks, pre-requisites, display settings, and certificates.
After completion, select the publish or save button for saving the quiz.
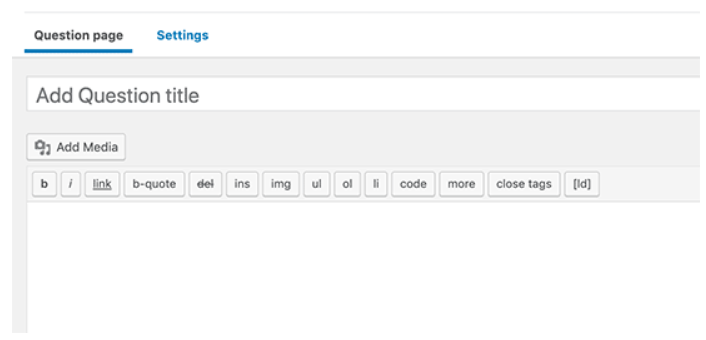
The quiz does not have anything right now. So, you can change it by integrating a few questions here. Move to LearnDash LMS -> Questions page and then, select the Add New button.
Select the answer type of question from the right column. According to the answer type, the question choices also get changed.
Next, you can insert the answer choices. You have an option here to choose the message to be shown on the right answer.
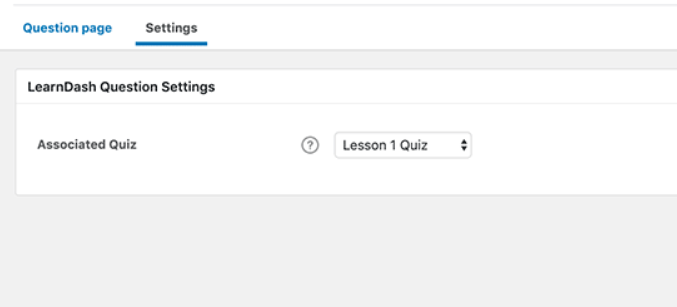
When all this completes, move to the Settings tab and integrate the question to the quiz made earlier.
Keep in mind to click on the Save button before moving to add the other question. You can integrate as many questions as you want to in the quiz.
Authorize Assignments in LearnDash
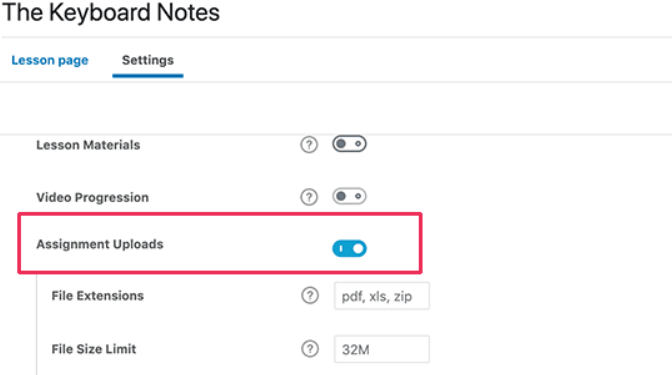
Including the assignments by changing the lesson and moving to the lesson option area easily. But, it is advised to check the box adjacent to the upload assignment option.
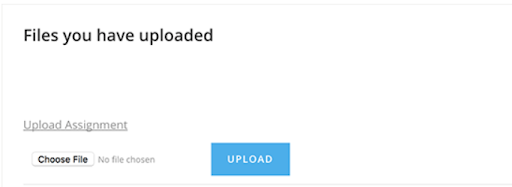
Later, the assignment guidelines for the lesson can be provided. When the lesson finishes, the users will notice an option for uploading the assignment.
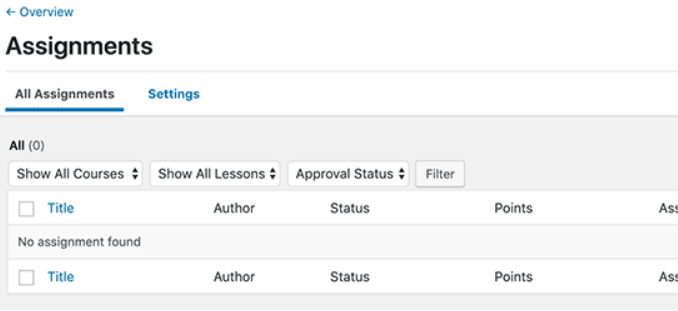
After uploading the assignments to all users, you can check them by navigating to LearnDash LMS ->Assignments page.
This page allows you to update the assignments, accept them, or provide comments on given assignments.
Step 6# Providing Certificates on Course Completion
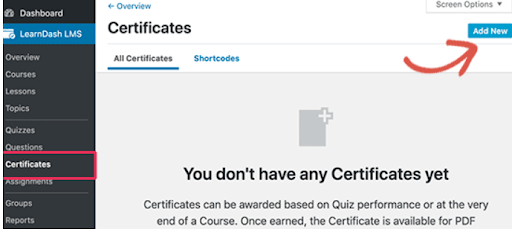
LearnDash enables you to provide certifications after the course completion automatically. Though, making a certificate in LearnDash needs basic HTML knowledge. So, first of all, you require a certificate image file. It is, generally, the background image that is used for the certificates. The certificate templates can be found form Canva (free image creating the website). After finding the template you want, remove the text from this and download it on the PC. Afterward, move to the LearnDash LMS -> Certificates page and select the ‘Add New’ button.
It will take you to the certificate edit screen. From this page, you can set the background image, you can download the same as the featured image.
Next, you have to use the visual editor. For that, select the shortcodes button to include the LearnDash metadata to the certificate. From the shortcode, including the user name, course title, and other data.
When you are ok with the certificate, publish it. Now, include that certificate to the lesson, course, and quiz. Like; the certificate can be issued on the course completion, after the quiz completion and concluding the lesson.
For adding the certificate, change the lesson, course, and quiz and move to the settings tab. You can choose the created certificate from here.
How to Calculate the Cost of the WordPress LMS Creation?
If you want to create a large and complicated LMS, you should not create it immediately before testing the business model and functionality, but ensure that it performs perfectly. Just like the costs charged by most agencies per hour below is an analysis of the time it might take to create a Learning Management System first version according to the size, complexity, and customization:- 20 hours for testing
- 40 hrs for integrations
- 40 to 100 hours for business analysis
- 50 to 100 hours for platform architecture for more substantial projects
- 60 to 80 hours for proposing 2-3 design choices and reviews
- 65 to 100 hours for creating the backend and frontend functionalities
- Extra time for project management, code reviews, media or content creation, 3rd party tools installations, etc.
Let's Discuss your Next Project Now
Concluding Remarks
To sum up, we can say that LearnDash and WordPress have made it an easy task to create a powerful Learning Management System. We hope that our article has given you the best of the knowledge for the same. In case, even now, you are not sure about creating the successful WordPress LMS, then you can contact us. Our professionals will help you to achieve so. Last but not the least, building WordPress LMS is not the end of your job, you need to make sure, it is reaching the most. Promote it by leveraging the below tips:- Select the LearnDash ready WordPress theme
- Build the landing pages for the online courses
- Know the Search Engine Optimization Basics
- Track marketing data
- Start creating an email list
- Convert website visitors into customers and subscribers