


A Complete Guide to Submit Your Plugins to WordPress.org
WordPress repository has more 50,000 plugins in its repository that covers all the essential features and functionalities for your powerful website. Clearly, the figure that WordPress incorporates shows that there are plugins that you require for every feature you needed on your WordPress website.
And, this number is regularly increasing at a rapid pace. These plugins are either free and premium. The user can use according to the requirement and budget. These are licensed in the General Public License (GPL).
Surprisingly, the WordPress Plugin Directory has several plugins in its pocket. The reason behind this is that they do not find a suitable plugin to fit-in their needs.
Surely, there are chances that you might also have faced this issue. Plugins make it more accessible for the users to integrate the features to their website without any technical expertise. Hence, it reduces a lot of work at your end.
Have you ever thought to create the one?
Why not take advantage of sharing the plugins with the entire WordPress community?
Here, in this article, we will provide you with a comprehensive guide on how and why to create your own plugin in WordPress.org?
So, let’s get started without any further delay!!
 Though, the reasons for publishing plugins vary for every business requirement. But, we have researched some general reasons that specify that owning plugin is beneficial.
Find out below:
Though, the reasons for publishing plugins vary for every business requirement. But, we have researched some general reasons that specify that owning plugin is beneficial.
Find out below:


 Now, follow the link to add the plugin. Add the plugin description. For the plugin URL, compress the plugin files, upload the plugin.zip file to your WordPress website.
 Here, assure that you can upload the compressed file to Google Drive and to the compressed file. Also, integrate the public link to the plugin zip file.

 The response will be in the form of:
Reject, Accept (temporary or permanent)?
It displays that the wpmerchant directory is added to the PC. The assets, branches, and trunk directory were previously added in the wpmerchant Subversion repository directory. And, after having the files in the trunk directory, add the files in the subversion repository for tracking. Use the command line below to get it done.
The response will be in the form of:
Reject, Accept (temporary or permanent)?
It displays that the wpmerchant directory is added to the PC. The assets, branches, and trunk directory were previously added in the wpmerchant Subversion repository directory. And, after having the files in the trunk directory, add the files in the subversion repository for tracking. Use the command line below to get it done.
 Change it to the central repository by:
 And it is done!! Check the WordPress Plugin directory page, and now you can see your uploaded image.
1. Why Publishing a Plugin is Advantageous?
Though, the reasons for publishing plugins vary for every business requirement. But, we have researched some general reasons that specify that owning plugin is beneficial.
Find out below:
1.1) Regular Support
After being a part of the WordPress community, you can ask to rate and review the plugin. Also, the repository also demands support from the interface. It implies, there is not an issue of managing the support externally.1.2) Update Alerts
The repository can also send alerts to the users about the regular plugin updates. Also, this is also helpful in adding features and fixing bugs.1.3) Version Control
Undoubtedly, maintaining a history of every WordPress plugin is also possible. You can also cooperate on it with some other developers with the Subversion (It is the control software in the WordPress repository servers).- Subversion version control
Hurry Up! To schedule free consultation
# Repository- It is the central platform to retrieve and story work.
- The information is available to every WordPress developer.
- Integrated to theme and plugin update
1.4) Trunk: Meant for the active development
# Tags- Incorporates every single version of the WordPress plugin.
- The versions should be numbered with three digits, such as 2 (major rewrite), .2 (feature update of the plugin) and .0 (bug fix).
- Developed to check out the process of plugin development.
- The changes and updates can be transcribed locally.
- For your convenience, it copies the tags, assets, and truck locally.
- This process happened when the updates-testing method completes.
- Pushing the new version with the updated tag to publish to the repository.
- Precisely, If your tag update in reade.txt file is greater than the plugin version on the client's installation, then the community notifies that a new plugin is available to install.
2. Why Choose WordPress Plugin Directory?
- Take the benefits of several excellent services and tools (statistics, plugin description, support form changelog, active installs, etc.) for free.
- You get notified every time whenever a new version is available and can get updated from the WordPress plugin screen directly.
- Higher visibility in all search engines (Google, Yandex, Yahoo, and Bing).
- Stable medium to promote the identity and to grow your status as the developer.
- An exceptional method to generate loose traffic and eyeballs on your plugin.
3. How to Submit Your Plugin to the WordPress Plugin Directory?
Before, checking the submission process of WordPress plugin, you need to look after the below guidelines:- Assure that your plugin is GPL compatible.
- User consent is required before storing the user credentials.
- Not spamming users.
- Do not include confusing code.
- Stay yourself away from illegal and substantially offensive ideas.
- Do not include the external links on the public website.
Step 1: Check out the Plugin in the WordPress Repository
Go to WordPress.org and then, Write your coveted plugin name in the Search plugin - Input. If it does not exist, then, there are chances that the plugin with the same name is still present. Besides, the only thing which is not letting it display is: the Subversion commit is not submitted. So, it is better to choose a unique and exclusive name.
Step 2: Generate a Plugin That Works
Since there is not a standard or official framework to create a plugin, but the one that is used in many cases is- WordPress Plugin- Boilerplate or DeviVison. It is perfect and meant for more substantial projects. After the creation of the plugin, you need to update the code and test all the functionalities several times to ensure the proper functioning of every part.Step 3: Justify the Readme file
This file is utilized for putting in the plugin's WordPress Plugin Directory page. Here, you need to give:- plugin name
- contributors (WordPress author IDs)
- tags
- donate link
- suitable WordPress version
- license (GPL)
- plugin short description
Want to customize your WordPress site? Get Started Now !
Step 4: Submit Plugin for Review
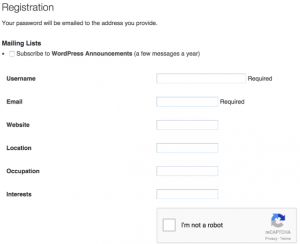
After processing the above-mentioned steps, submit the plugin for the manual review. For that, it is required to create a WordPress account.
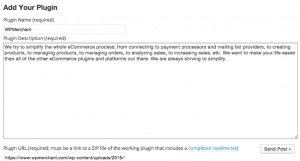
Now, follow the link to add the plugin. Add the plugin description. For the plugin URL, compress the plugin files, upload the plugin.zip file to your WordPress website.
Here, assure that you can upload the compressed file to Google Drive and to the compressed file. Also, integrate the public link to the plugin zip file.
Step 5: Waiting for Approval
The plugins of WordPress Plugin Directory are reviewed manually, now. The approval can be given in some amount of time. The maximum time it takes is 8 hours for the revision and approval.
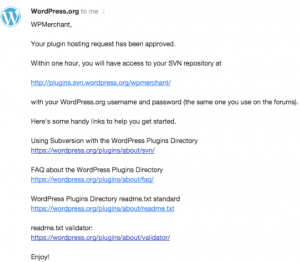
Step 6: Request approval
The approval mail is sent from the WordPress community. From this step, a surety will be achieved whether the plugin is approved or not!!
Step 7: Storing the plugin in the WordPress Subversion repository
When the plugin is approved, the storage of the plugin is done in the WordPress Subversion Repository. In other words, it is the place where are plugins are stored. And, the changes can be done only by the contributors in the readme file. But, anyone can take your plugin copy from the WordPress repository. The plugin can be stored in two sets of instructions, one, is for those who are using the Windows, and, the other is for the Mac. Here, we are discussing the reliable one. The storage of the plugin is in the WordPress.org SVN repository. Keep in mind, the check out can be done by anyone, but the check-in is accessible only to the author. Now, after navigating to the parent directory, run the command in the terminal window. So, it integrates the central WordPress subversion repository in the local repository.4. Plugin Structure
After publishing the plugin, new files, editing, or deleting the existing files on the local machines, the change uploading process on the server proceeds. Hence, these changes are tracked by the sub-version so that you can get back on the existing version and can revise later. SVN directory has four default folders, namely:- Assets: It holds headers, screenshots, and icons.
- Trunk: The directory in which the plugins are stored.
- Branches: It contains Different branches of code.
- Tags: The storage of plugins lies in tags.
4.1) Plugin Asset
- These are the plugin icon, header, and screenshot.
- The headers are PNG or JPG images that can be seen at the top of the plugin page.
- The name of the files is dependent on the image height and width.
- Retina:Banner-1544X500.png/jpg
- Regular: Banner-7724X540.png/jpg
- icon:128×128.(jpg|png)
- icon:256×256.(jpg|png)
- icon.svg
- Screenshot-1.png or jpg
- Screenshot-2.png or jpg
4.2) Plugin Header Comment
The header is here to notify WordPress that a file is a plugin.Hurry Up! To schedule free consultation
Now, to submit the plugin, you should add more information to make the plugin functionality better. Here, we have created a list of accessible fields:- Plugin name: The name should be unique. Assure that the name you have decided is not the list already.
- Plugin URL: Plugin home page
- Version: Current plugin version or higher (if available).
- Description: Not more than 140 characters.
- Author URL: Author’s home page
- Author: one or more author-name; divided by commas
- License: Plugin’s license slug
- Text domain: Plugin’s text domain
- License URL: Link to the complete text of the license.
- Domain path: The path to find the translation files
4.3) Readme.txt File
The plugin should be provided with the readme.txt file with the suitable headers in the main script. So, the readme.txt file is required with the below information:- Plugin name
- Donate link
- Contributors
- Requires at least
- Tags
- Stable tag
- Tested up to
- License
- License URI
- Description
- Installation
- Screenshots
- Changelog