


How and Why You Should Install CDN with Your WordPress Website?
We all have must hear about CDN. Through this post, I am going to tell you what CDN is, what are its benefits and how to set it up on your WordPress site.
CDN is an acronym used for Content Delivery Network. Many referred it as a dedicated server setup responsible for efficient and faster media delivery. It has incredibly proved its worth by being an ultimate solution for optimizing websites globally.
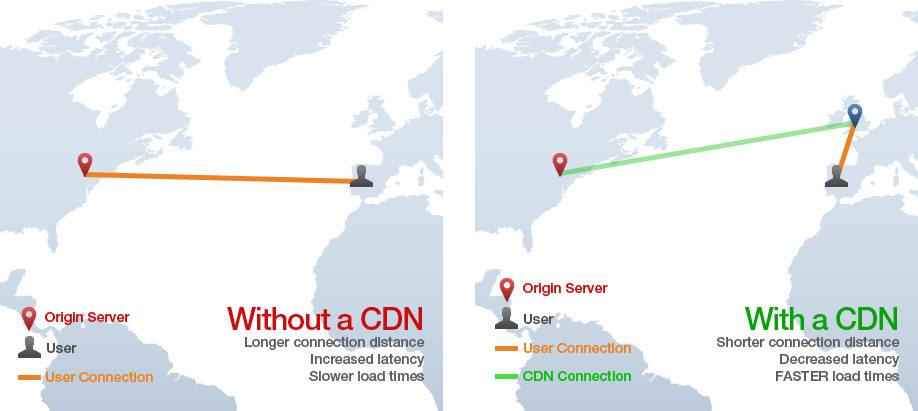
Let us understand it in much simpler way. Assume you’re in Baker Street, London (This will be the location of your web browser’s central host server) and now you want to access the website of WordSuccor Ltd! whose central server host is in Indiana, USA. The geographical location of central hosting server plays a crucial role here. As the distance between the hosting server is big, the time to load such content will be more. This can lead to viewers leaving your website and it is bad for you isn’t it?
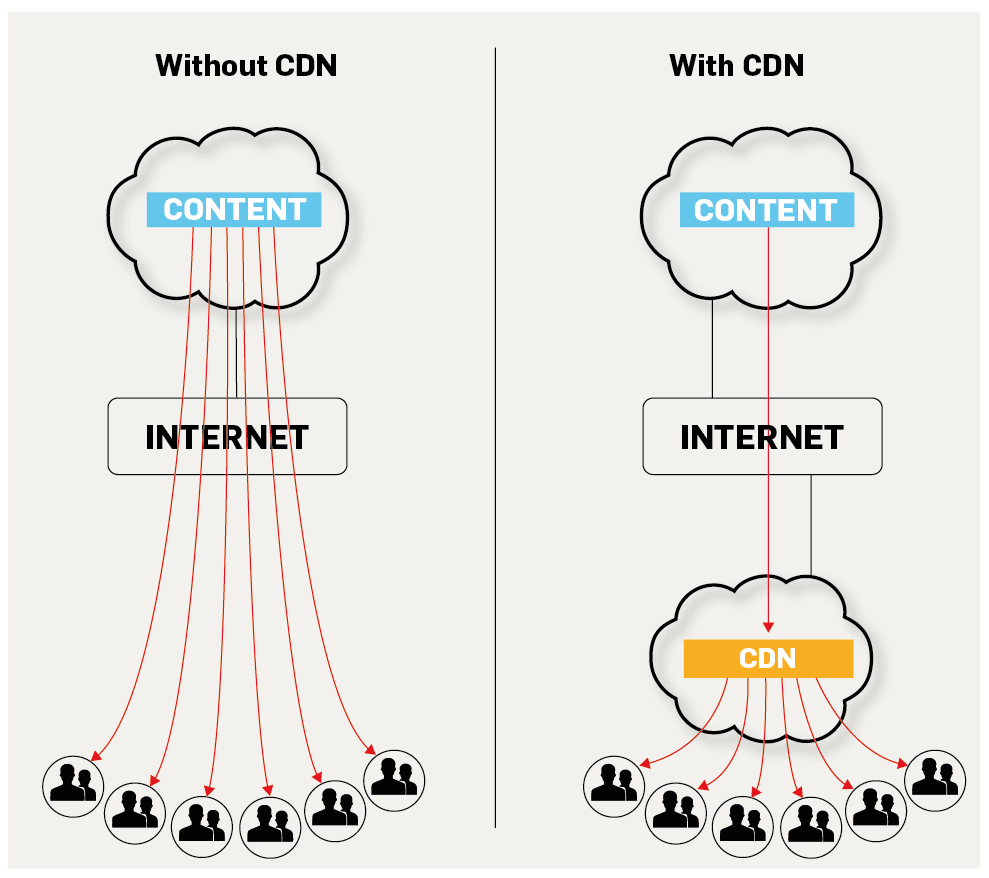
Here, Content Delivery Network can be the twist in the entire phenomenon. What is does is a just simple alteration of the central hosting server. However, this alteration is not physical in nature. A CDN simply sends a cached file of all the media content of your website to the hosting server near your viewer’s location and this simple step significantly decrease the loading time of your website. And that’s not just it. With faster loading time, it can help your website in 5 notable ways.
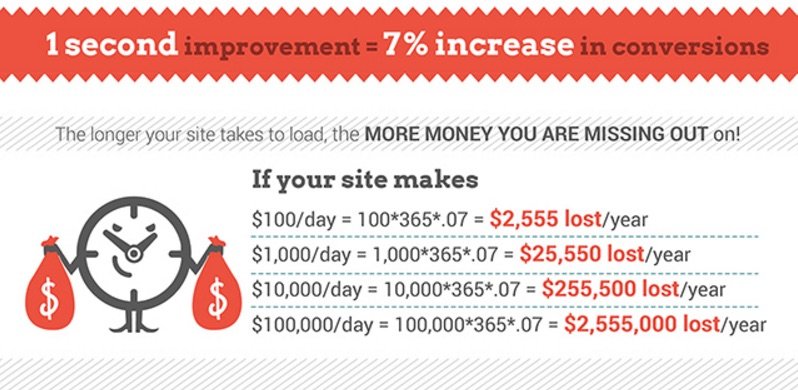
 With CDN installed on your website, your website tends to work faster than ever. This results in the increase in response time, which in return increase the loyalty of your customer. Even one-second delay can make a huge psychological impact on the potential customer of your company.
 As the load on the central hosting server of your website is shared by other hosting servers present globally, the website tends to resist sudden crashes of your website. Hence CDN can be very efficient for e-commerce website as it can result in very positive outcomes in terms of revenue.
 Faster loading of web pages can lead to the decline of bounce rate which can lead to your website’s increased page views. Isn’t that awesome user experience? This will also lead into global reach of your website which can provide great profits.
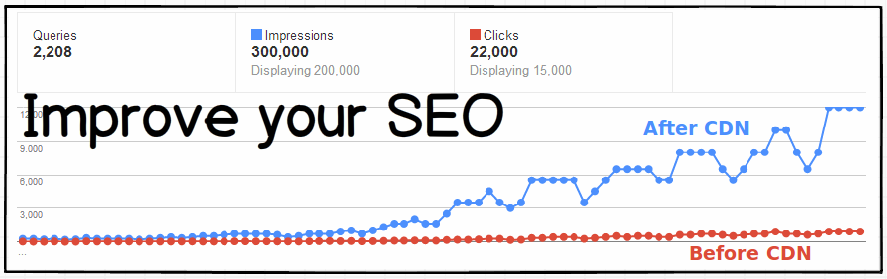 As per Google, faster websites tend to rank higher in SERPs in search results. This particular factor will result in increase in SEO ranking and also reachability of your website through search engines alone.
 A CDN allows you to establish your company’s presence in such areas where it is really difficult to mark presence without having any physical presence. In these areas, either you need to have physical existence or owning a web hosting server. But because of CDN, you can easily mark your presence from the local hosting server without any additional cost, even in such countries where they are protected by global firewalls.
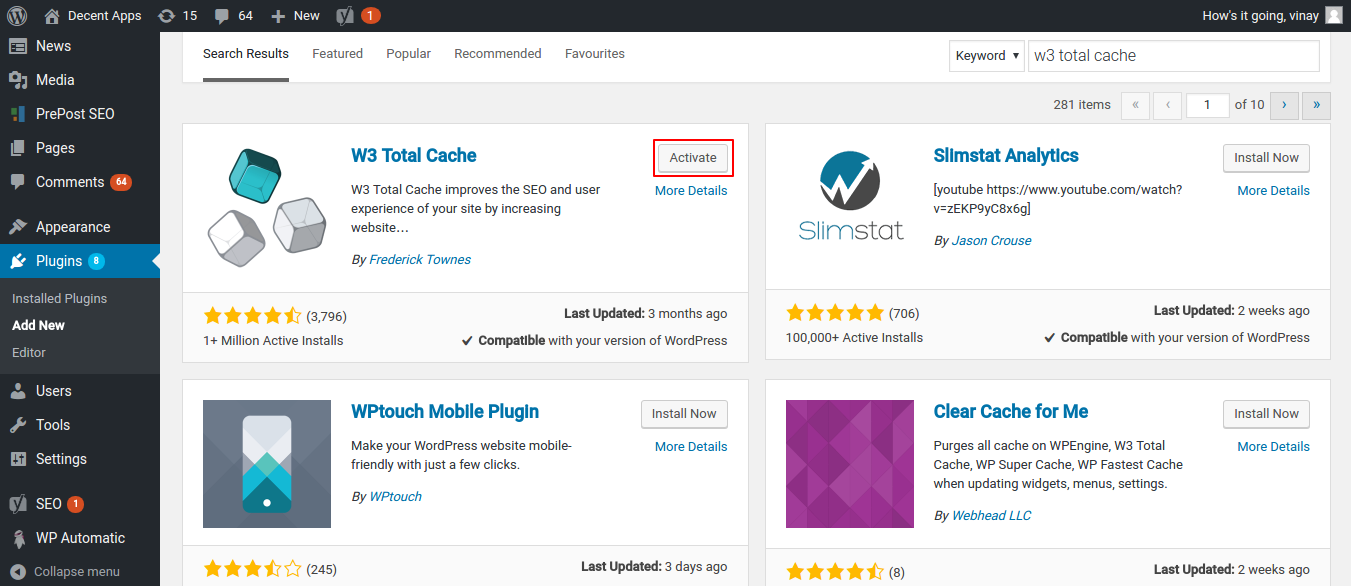
 2. When the plugin is installed, you’ll see a dialogue box. At the bottom of the box, you’ll find an option “Activate the Plugin”. Just click that option.
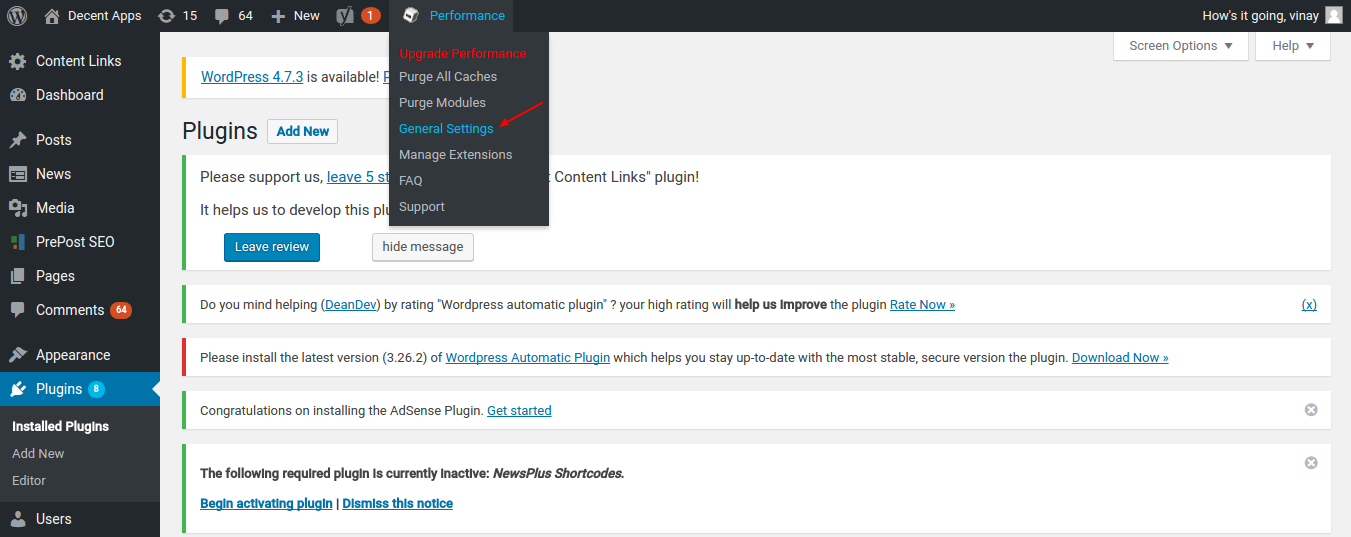
 3. Once the plugin is installed, you’ll see a new option in the menu named “Performance”, hover the pointer over it and then select “General Setting”.
 After the Step 3, now we are all set to configure the “W3 Total Cache” plugin and I need your special attention on this.
4. Once you select “General Setting”, a new dialogue box will appear, scroll down to “Page Cache” segment and check the “Page Cache” option to enable it. Also, confirm that the “Page Cache Method” is “Disk-Enhanced”.
After the Step 3, now we are all set to configure the “W3 Total Cache” plugin and I need your special attention on this.
4. Once you select “General Setting”, a new dialogue box will appear, scroll down to “Page Cache” segment and check the “Page Cache” option to enable it. Also, confirm that the “Page Cache Method” is “Disk-Enhanced”.
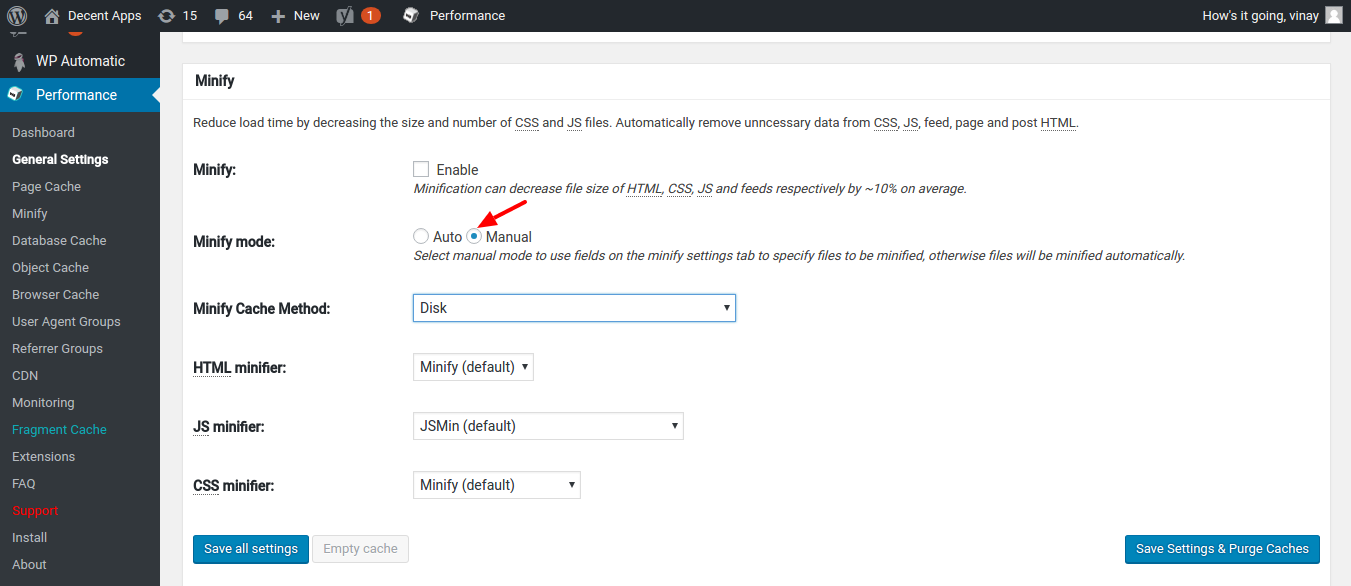
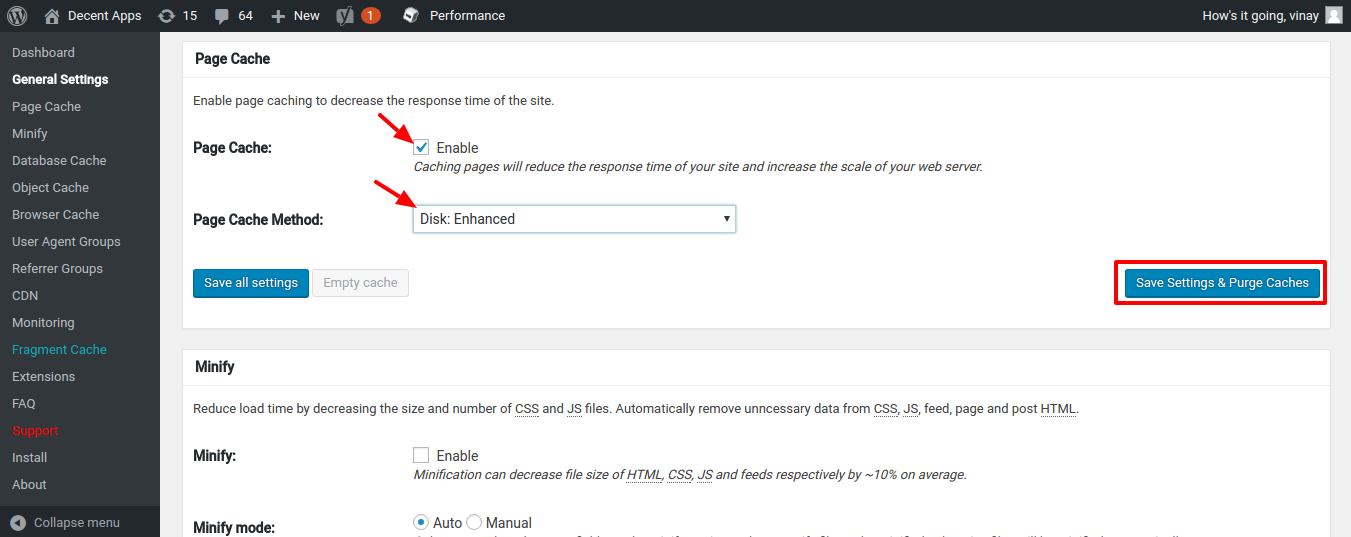 5. In the subsequent option down the box, enable the “Minify” option and select the “Minify Mode” as “Manual”.
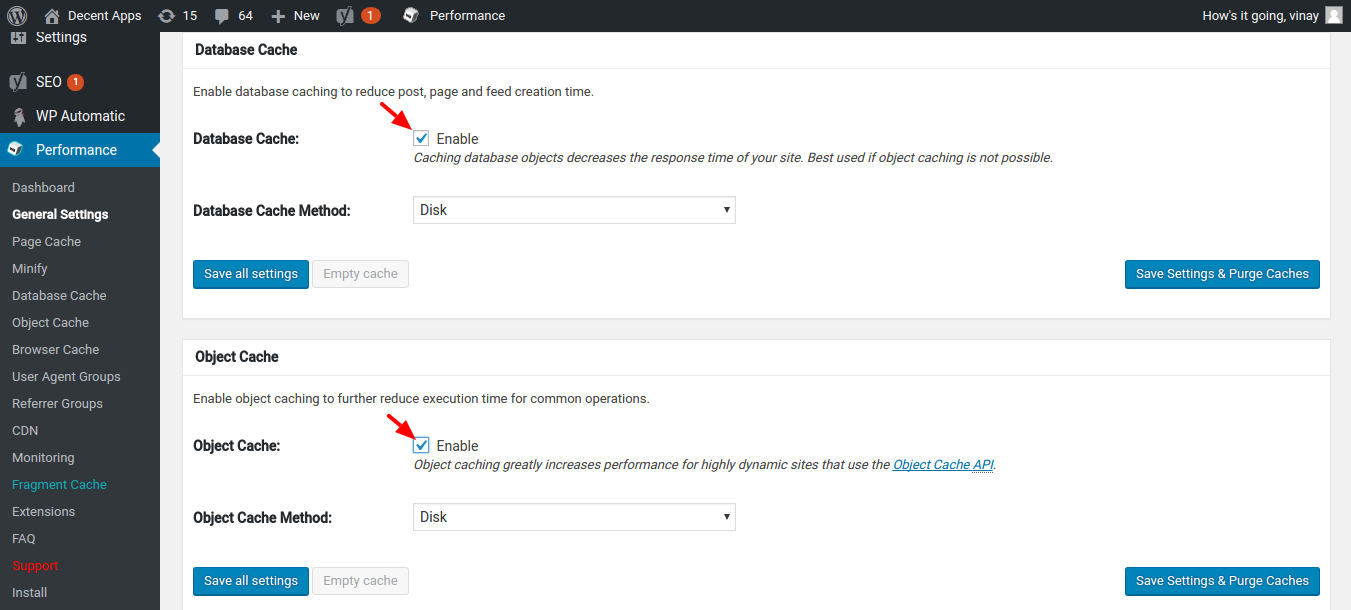
 6. In the “Database Cache” option, make sure the “Database Cache” is disabled. In the “Object Cache” and “Browser Cache” option, make sure both are “Enabled”.
 7. Enable the CDN and select CDN Type as “MaxCDN”.
8. Then on the left-hand side, hover over performance again and select “CDN”. Now you can edit the CDN settings.
7. Enable the CDN and select CDN Type as “MaxCDN”.
8. Then on the left-hand side, hover over performance again and select “CDN”. Now you can edit the CDN settings.
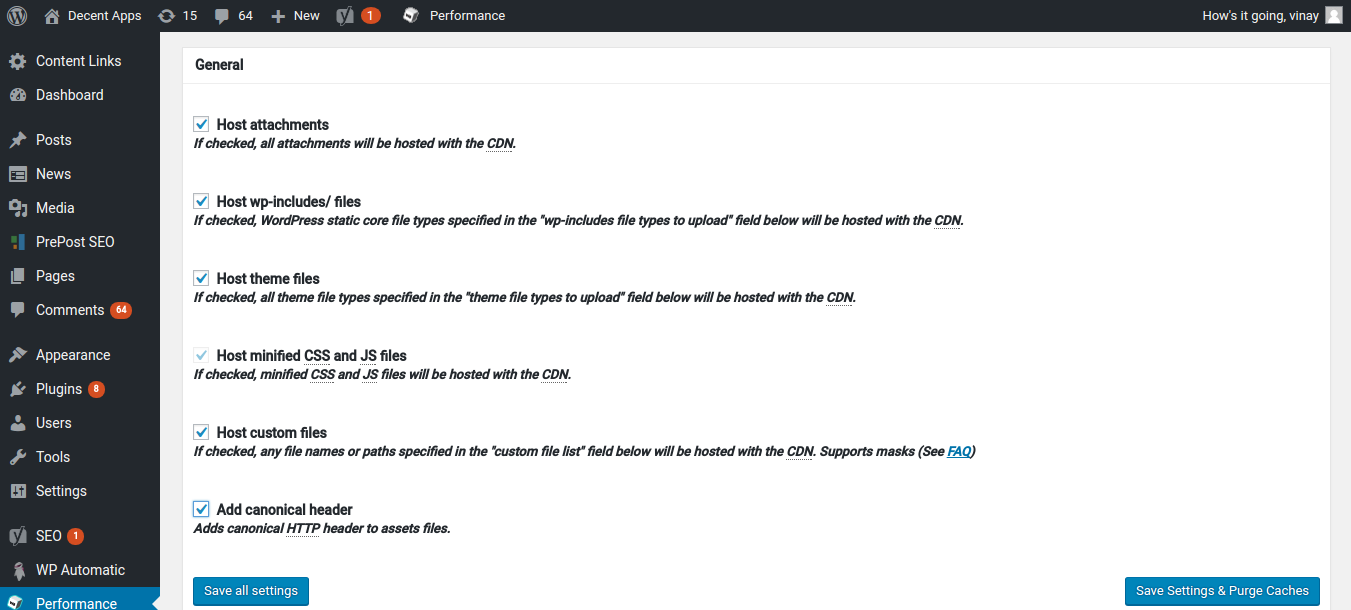
 9. In the “General” option, check on “Host Attachment”, “Host wp-Includes/Files”, “Host Theme Files”, “Host Minified CSS & JS Files”, “Host Custom Files”, and for better SEO, select “Add Canonical Headers”.
 10. When you Scroll down to “Configuration” you need to fill in the API details, which are your “Alias”, “Consumer Key” and “Consumer Secret”. The format should be like ‘Alias+Key+Secret’. Then click on “Authorize” button.
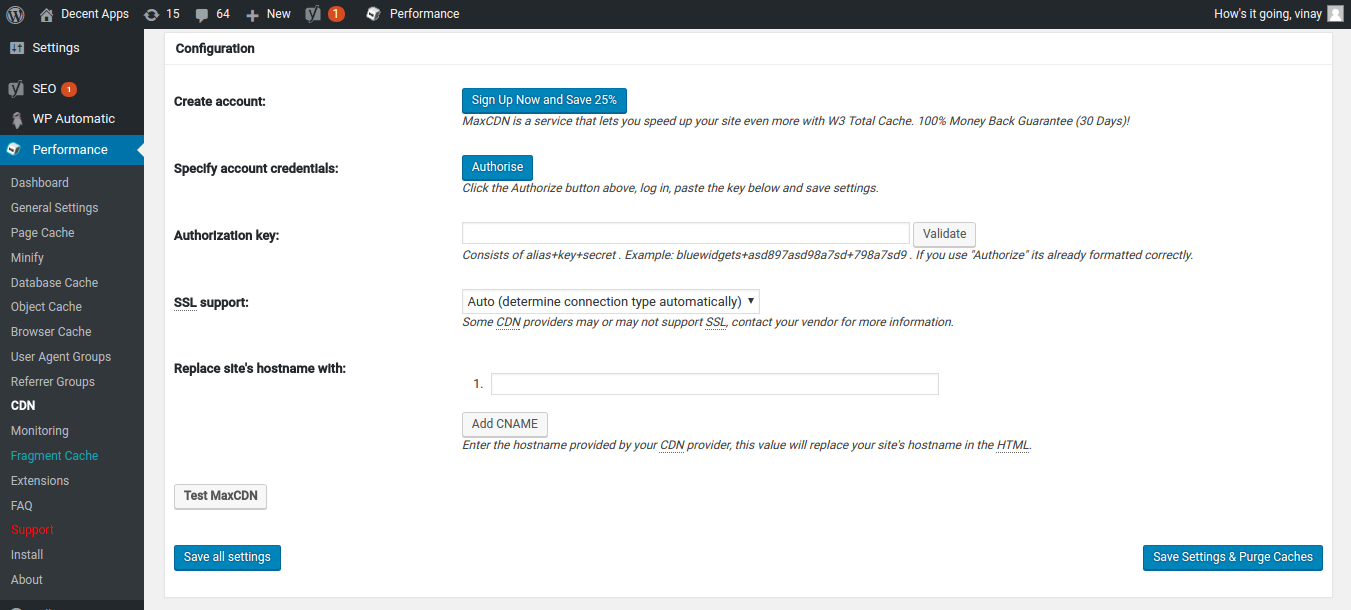 11. Now you have to enter your CDN domain name, just click on “Manage ” option in your MaxCDN panel. There your “CDN URL” will be present. Copy-Paste it & you’re done. (Note: Before you do this step make sure you had gone through the link I had provided above to Create a Pull Zone and followed that dully).
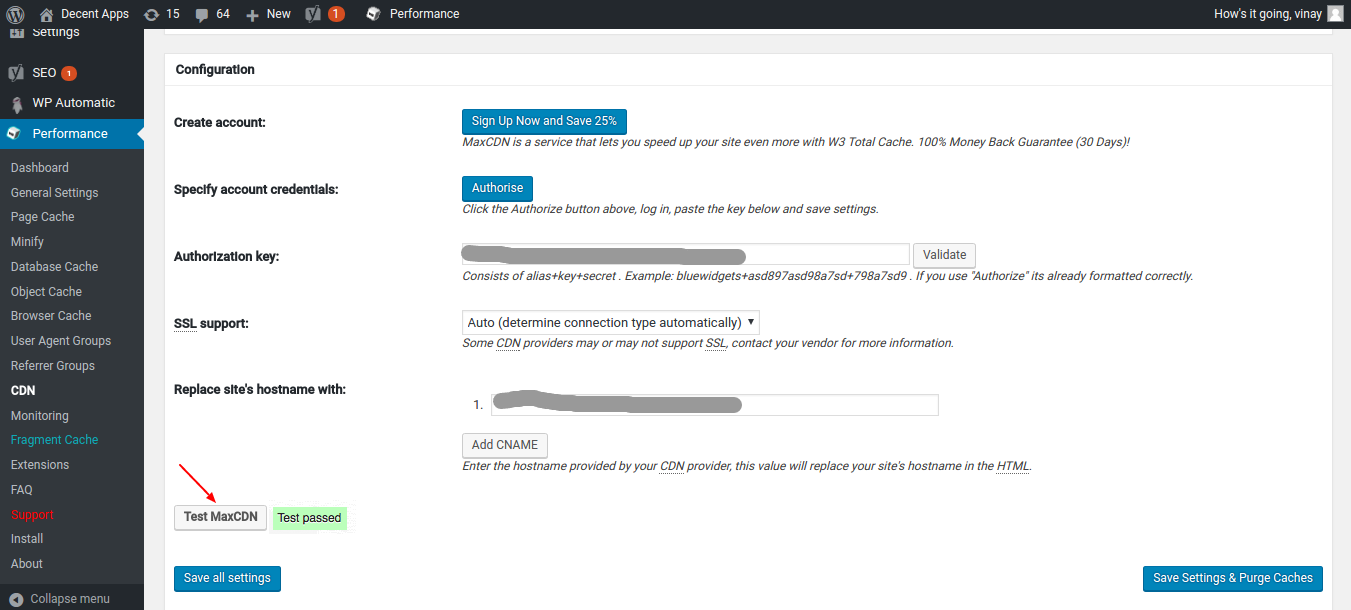
12. Now, everything is in order, so click on “Test MaxCDN”. It will show you A green colored message. (If not please let me know through comments). To finish up, click on “Save All Settings”.
11. Now you have to enter your CDN domain name, just click on “Manage ” option in your MaxCDN panel. There your “CDN URL” will be present. Copy-Paste it & you’re done. (Note: Before you do this step make sure you had gone through the link I had provided above to Create a Pull Zone and followed that dully).
12. Now, everything is in order, so click on “Test MaxCDN”. It will show you A green colored message. (If not please let me know through comments). To finish up, click on “Save All Settings”.
 So, you have successfully installed and configured W3 Total Cache, and you’re all set.
Why CDN?
Speed & Reliability
With CDN installed on your website, your website tends to work faster than ever. This results in the increase in response time, which in return increase the loyalty of your customer. Even one-second delay can make a huge psychological impact on the potential customer of your company.
Crash Resistance
As the load on the central hosting server of your website is shared by other hosting servers present globally, the website tends to resist sudden crashes of your website. Hence CDN can be very efficient for e-commerce website as it can result in very positive outcomes in terms of revenue.
Awesome User Experience
Faster loading of web pages can lead to the decline of bounce rate which can lead to your website’s increased page views. Isn’t that awesome user experience? This will also lead into global reach of your website which can provide great profits.
Improved SEO Ranking
As per Google, faster websites tend to rank higher in SERPs in search results. This particular factor will result in increase in SEO ranking and also reachability of your website through search engines alone.
All Services can fuse into one Unpretentious Plan
A CDN allows you to establish your company’s presence in such areas where it is really difficult to mark presence without having any physical presence. In these areas, either you need to have physical existence or owning a web hosting server. But because of CDN, you can easily mark your presence from the local hosting server without any additional cost, even in such countries where they are protected by global firewalls.
How to Install CDN?
Let's dive you into the process of installing CDN. Here we are using on ethe best CDN plugins for WordPress i.e. W3 Total Cache. Before installing the plugin I would like to give you a little introduction. It is an agnostic WPO (WordPress Performance Optimization) rated 4.5 stars out of 5. It improves the SEO of your WordPress site along with the user experience (These sidekicks are already mentioned above!!!)Installing & Configuring CDN Plugin for WordPress
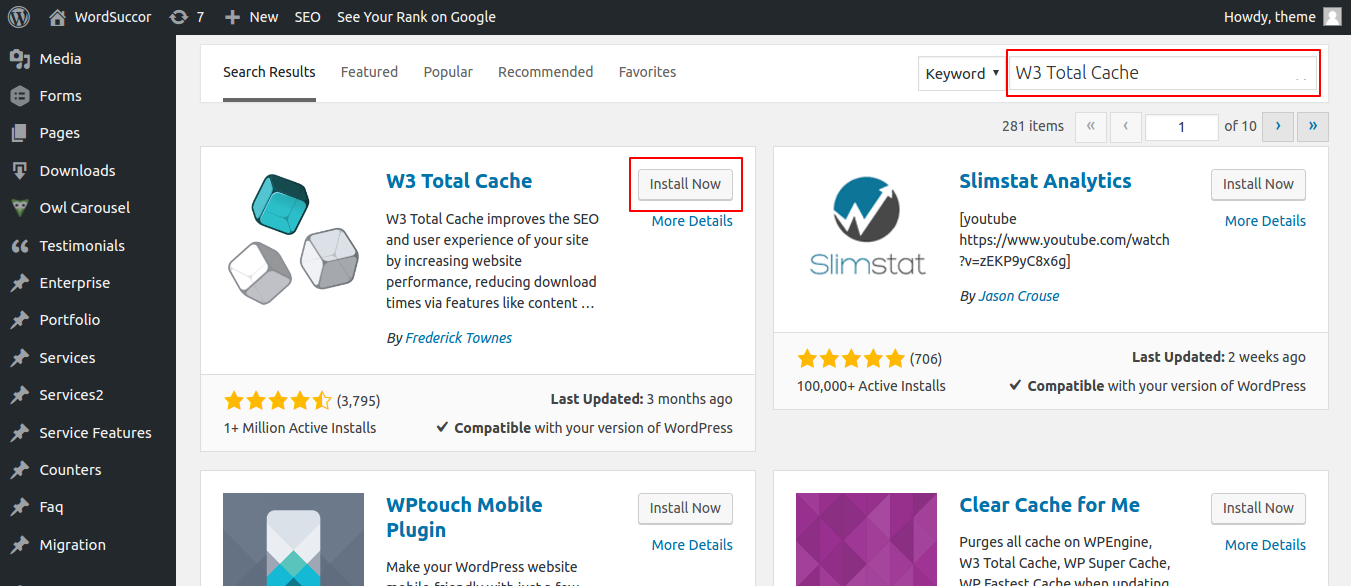
Before we get started I want to recommend every viewer to go through this link, How to Create a Pull Zone before going through the tutorial. I hope you heard me, so let’s get started, 1. First, go to the plugin section of your WordPress Dashboard and search for the plugin “W3 Total Cache”. When you get the plugin on the list, simply click on “Install Now”.
2. When the plugin is installed, you’ll see a dialogue box. At the bottom of the box, you’ll find an option “Activate the Plugin”. Just click that option.
3. Once the plugin is installed, you’ll see a new option in the menu named “Performance”, hover the pointer over it and then select “General Setting”.
After the Step 3, now we are all set to configure the “W3 Total Cache” plugin and I need your special attention on this.
4. Once you select “General Setting”, a new dialogue box will appear, scroll down to “Page Cache” segment and check the “Page Cache” option to enable it. Also, confirm that the “Page Cache Method” is “Disk-Enhanced”.
5. In the subsequent option down the box, enable the “Minify” option and select the “Minify Mode” as “Manual”.
6. In the “Database Cache” option, make sure the “Database Cache” is disabled. In the “Object Cache” and “Browser Cache” option, make sure both are “Enabled”.
7. Enable the CDN and select CDN Type as “MaxCDN”.
8. Then on the left-hand side, hover over performance again and select “CDN”. Now you can edit the CDN settings.
9. In the “General” option, check on “Host Attachment”, “Host wp-Includes/Files”, “Host Theme Files”, “Host Minified CSS & JS Files”, “Host Custom Files”, and for better SEO, select “Add Canonical Headers”.
10. When you Scroll down to “Configuration” you need to fill in the API details, which are your “Alias”, “Consumer Key” and “Consumer Secret”. The format should be like ‘Alias+Key+Secret’. Then click on “Authorize” button.
11. Now you have to enter your CDN domain name, just click on “Manage ” option in your MaxCDN panel. There your “CDN URL” will be present. Copy-Paste it & you’re done. (Note: Before you do this step make sure you had gone through the link I had provided above to Create a Pull Zone and followed that dully).
12. Now, everything is in order, so click on “Test MaxCDN”. It will show you A green colored message. (If not please let me know through comments). To finish up, click on “Save All Settings”.
So, you have successfully installed and configured W3 Total Cache, and you’re all set.
Conclusion:
As you can see this process is not very hectic. However, it is always good to consult a professional:-). If you stuck somewhere, let me know through comments and I’ll assist you as much as I can. Share it if you find this post useful.Improve your WordPress site’s loading time, supercharge it by setting CDN